Table of Contents
📂 Key Takeaways
- VPD Optimization: Target VPD of 0.8-1.1 kPa during vegetative growth and 1.0-1.5 kPa during flowering. VPD provides more accurate environmental control than temperature and humidity alone by accounting for the relationship between both factors.
- Dehumidification is Critical: Flowering cannabis transpires 0.5-1 gallon of water per plant per day. Without adequate dehumidification, humidity will rise to problematic levels, increasing mold and mildew risk. Size dehumidifiers based on plant count and transpiration rates, not just room size.
- Temperature Differential Matters: Maintain 10-15°F cooler temperatures during lights-off compared to lights-on. This day/night differential mimics natural conditions, promotes healthy growth, and can enhance color development and terpene production.
- Humidity by Stage: Reduce humidity progressively throughout the grow cycle: 60-70% seedling, 50-60% vegetative, 40-50% early flowering, 35-45% late flowering. This progression supports plant development and prevents disease.
- Automation Saves Crops: Manual climate control requires constant monitoring and adjustment. Quality automated controllers maintain optimal conditions 24/7, preventing the environmental swings that stress plants and reduce yields. The investment in automation pays for itself through improved results and peace of mind.
🔍 Introduction: Why Climate Control Matters
Climate control is the foundation of successful indoor cannabis cultivation. While genetics, lighting, and nutrients all contribute to final results, environmental conditions determine whether plants can express their genetic potential. Temperature and humidity directly affect every physiological process in cannabis plants, from photosynthesis and transpiration to nutrient uptake and cannabinoid production.
The relationship between climate and cannabis quality is direct and measurable. Plants growing in optimal environmental conditions display faster growth rates, stronger disease resistance, higher yields, better cannabinoid profiles, and enhanced terpene production compared to plants in suboptimal conditions. Conversely, poor climate control leads to slow growth, increased pest and disease pressure, reduced yields, and inferior product quality.
Modern cannabis cultivation has evolved beyond simple temperature and humidity monitoring to sophisticated climate management based on Vapor Pressure Deficit (VPD). VPD accounts for the relationship between temperature and humidity, providing a more accurate measure of environmental conditions than either factor alone. Understanding and optimizing VPD allows growers to fine-tune transpiration rates, maximize nutrient uptake, and achieve professional-level results.
Climate control equipment has become increasingly sophisticated and accessible. Today’s home growers have access to the same automated control systems used in commercial operations, allowing precise environmental management without constant manual intervention. Smart controllers can maintain optimal VPD automatically, adjusting multiple devices based on real-time sensor data and programmable schedules.
This guide covers everything you need to know about climate control equipment for cannabis cultivation. You’ll learn optimal environmental ranges for each growth stage, how to select and size dehumidifiers, air conditioners, humidifiers, and heaters, how to implement automated control systems, and how to troubleshoot common climate problems. Whether you’re setting up your first grow tent or optimizing an existing operation, mastering climate control is essential for cultivation success. For complete growing information, see our Complete Beginner’s Guide to Growing Cannabis.
📂 Understanding Temperature Requirements
Temperature is one of the most critical environmental factors affecting cannabis growth and development. Cannabis is a warm-season plant that thrives in specific temperature ranges. Understanding these ranges and how temperature affects plant physiology helps you maintain optimal conditions throughout the grow cycle.
Optimal Temperature Ranges
Cannabis plants have different temperature requirements during lights-on (day) and lights-off (night) periods. These requirements also vary slightly between vegetative and flowering stages.
Vegetative Stage:
During vegetative growth, maintain 75-80°F (24-27°C) during lights-on periods. This warmer temperature range supports rapid growth and vigorous development. Plants in this temperature range display maximum photosynthetic efficiency, allowing them to convert light energy into biomass effectively.
During lights-off periods, reduce temperature to 65-70°F (18-21°C). This cooler night temperature is important for healthy development and mimics natural conditions where night temperatures are cooler than day temperatures.
Flowering Stage:
During flowering, slightly cooler temperatures are beneficial. Maintain 70-78°F (21-26°C) during lights-on and 60-68°F (15-20°C) during lights-off. The cooler temperatures during flowering can enhance color development, increase terpene production, and improve overall flower quality.
Some growers reduce temperatures further during the final weeks of flowering, dropping to 65-70°F during lights-on and 55-60°F during lights-off. This late-flowering temperature reduction can enhance anthocyanin production (purple coloration) and terpene development, though it may slightly reduce final yield.
Seedling and Clone Stage:
Young plants prefer slightly warmer conditions than mature plants. Maintain 75-80°F (24-27°C) consistently for seedlings and clones. Higher humidity combined with warm temperatures creates ideal conditions for root development and early growth.
Day/Night Temperature Differential
The temperature differential between lights-on and lights-off periods is as important as absolute temperature. A 10-15°F (5-8°C) differential between day and night temperatures mimics natural conditions and promotes healthy growth.
Benefits of Temperature Differential:
Proper day/night temperature differential provides several benefits. It promotes natural growth patterns that strengthen plant structure, enhances metabolic processes that improve nutrient utilization, can increase terpene production and improve aroma profiles, and may enhance anthocyanin production for color development.
Plants experiencing consistent temperatures without day/night variation often display stretched, weak growth. The temperature differential signals the plant to strengthen stems and develop more compact structure.
Implementing Temperature Differential:
Creating appropriate temperature differential is straightforward when using automated climate control. Program your controller to reduce heating or increase cooling during lights-off periods. Many smart controllers can automatically adjust climate equipment based on light schedules.
In spaces without active cooling or heating, temperature differential often occurs naturally. Grow lights generate heat during operation, raising temperature during lights-on. When lights turn off, temperature naturally drops. However, relying on natural temperature swings can result in excessive differentials or temperatures outside optimal ranges.
Temperature Effects on Growth
Temperature affects every aspect of cannabis growth and development. Understanding these effects helps you recognize temperature problems and optimize conditions.
Photosynthesis and Respiration:
Temperature directly affects photosynthetic efficiency. At optimal temperatures (75-80°F), cannabis plants achieve maximum photosynthetic rates. As temperature increases above 85°F, photosynthetic efficiency declines while respiration rates increase. This means plants consume more energy for maintenance while producing less energy through photosynthesis—a double negative that reduces growth rates.
At temperatures below 65°F, both photosynthesis and metabolic processes slow significantly. Plants in cold conditions grow slowly and may display nutrient deficiency symptoms even when nutrients are adequate, because cold temperatures reduce nutrient uptake and transport.
Transpiration and Nutrient Uptake:
Temperature affects transpiration rates, which drive nutrient uptake from roots. Warmer temperatures increase transpiration, pulling more water and nutrients from the root zone. However, excessive temperatures (above 85°F) can cause excessive transpiration that leads to moisture stress even when water is available.
Cold temperatures reduce transpiration, limiting nutrient uptake. This is why plants in cold conditions often display deficiency symptoms—nutrients are present but aren’t being transported to where they’re needed.
Flowering and Maturation:
Temperature during flowering affects cannabinoid and terpene production. Moderate temperatures (70-78°F) during flowering support optimal resin production. Excessive heat during flowering can degrade terpenes, reducing aroma and flavor. Very high temperatures (above 85°F) may also reduce THC content while increasing CBN, resulting in less potent product with more sedative effects.
Cooler temperatures during late flowering (final 2-3 weeks) can enhance terpene preservation and may increase trichome production. However, excessively cold temperatures (below 60°F) slow maturation and may reduce final yields.
Pest and Disease Pressure:
Temperature affects pest and disease development. Many common cannabis pests (spider mites, aphids) reproduce faster at warmer temperatures. Maintaining temperatures at the lower end of the optimal range can slow pest reproduction without harming plants.
Fungal diseases like powdery mildew and botrytis thrive in specific temperature ranges. Powdery mildew prefers 60-80°F, while botrytis thrives in cooler conditions (60-70°F) with high humidity. Proper temperature management combined with humidity control reduces disease pressure.
📂 Understanding Humidity Requirements
Relative humidity (RH) is the percentage of water vapor in the air compared to the maximum amount the air can hold at that temperature. Humidity requirements for cannabis change throughout the growth cycle, and maintaining appropriate humidity is essential for plant health and disease prevention.
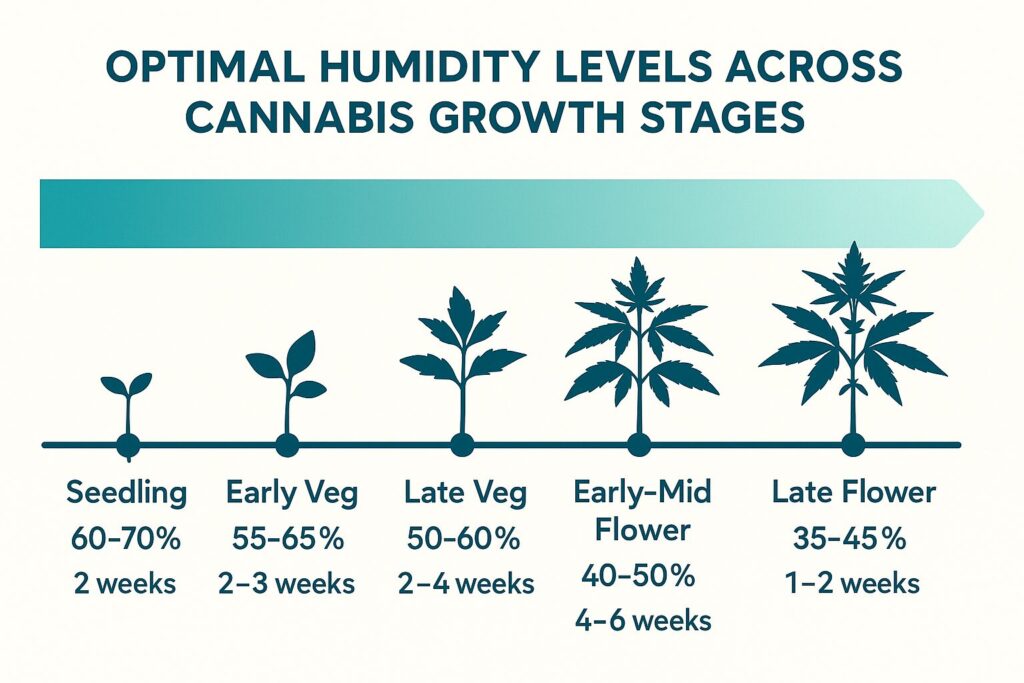
Figure 1: Optimal humidity levels across cannabis growth stages showing progressive reduction from seedling through harvest
Humidity by Growth Stage
Cannabis plants have different humidity requirements at different stages of development. Following these guidelines helps optimize growth and prevent problems.
Seedling Stage (Week 1-2):
Young seedlings have small root systems and rely heavily on foliar moisture absorption. Maintain 60-70% RH during the seedling stage. High humidity reduces transpiration stress and allows seedlings to focus energy on root development rather than moisture management.
Humidity domes or propagation trays help maintain high humidity around seedlings. Once seedlings develop several sets of true leaves and establish root systems, gradually reduce humidity toward vegetative levels.
Early Vegetative Stage (Week 3-4):
As plants develop stronger root systems, reduce humidity to 55-65% RH. This moderate humidity supports continued rapid growth while beginning to strengthen plant structure. The slight reduction in humidity encourages stronger stem development and prepares plants for lower humidity during flowering.
Late Vegetative Stage (Week 5-8):
During late vegetative growth, reduce humidity to 50-60% RH. This further strengthens plant structure and prepares plants for the lower humidity requirements of flowering. Plants in this humidity range develop thicker stems and stronger branches that can support heavy flower development.
Early to Mid-Flowering (Week 1-6 of flower):
Reduce humidity to 40-50% RH when plants enter flowering. Lower humidity during flowering is critical for preventing mold and mildew on developing flowers. As buds increase in size and density, they become increasingly susceptible to fungal problems in high humidity.
Maintain humidity at the lower end of this range (40-45%) if you’re growing dense, indica-dominant varieties that are particularly susceptible to mold. Sativa-dominant varieties with airier bud structure can tolerate slightly higher humidity (45-50%).
Late Flowering (Final 2-3 weeks):
During the final weeks before harvest, reduce humidity to 35-45% RH if possible. Very low humidity during late flowering reduces mold risk and can enhance terpene development. However, don’t sacrifice plant health to achieve very low humidity—40-50% is acceptable if lower humidity causes excessive transpiration stress.
Some growers reduce humidity to 30-35% during the final week before harvest to stress plants and increase resin production. While this technique can work, it requires careful monitoring to prevent excessive stress that could harm plants.
Humidity Effects on Plant Health
Humidity affects plant health through multiple mechanisms. Understanding these effects helps you recognize humidity problems and maintain optimal conditions.
Transpiration and Nutrient Uptake:
Humidity directly affects transpiration rates. Low humidity increases transpiration as moisture evaporates quickly from leaf surfaces. High humidity reduces transpiration because the air is already saturated with moisture.
Moderate transpiration rates are ideal for cannabis. Adequate transpiration pulls water and nutrients from roots, transports them through the plant, and delivers them where needed. Excessive transpiration (from very low humidity) can cause moisture stress even when water is available. Insufficient transpiration (from very high humidity) reduces nutrient uptake and can cause deficiency symptoms.
Stomatal Function:
Cannabis plants regulate gas exchange through stomata—tiny pores on leaf surfaces. Stomata open to allow CO2 uptake for photosynthesis and close to prevent excessive water loss. Humidity affects stomatal behavior.
In low humidity, plants partially close stomata to prevent excessive water loss. This reduces CO2 uptake and limits photosynthesis. In high humidity, stomata remain open, allowing maximum CO2 uptake. However, very high humidity can cause stomata to remain open even when plants should close them, potentially leading to edema (water-logged tissues) and other problems.
Growth Rate and Structure:
Humidity affects growth rate and plant structure. Moderate humidity (50-60% during vegetative growth) supports rapid growth with strong structure. High humidity (above 70%) can cause excessive vegetative growth with weak, stretched stems. Low humidity (below 40% during vegetative growth) slows growth and can cause leaf tip burn and other stress symptoms.
Humidity and Mold Prevention
High humidity during flowering is the primary risk factor for mold and mildew problems. Understanding this relationship is critical for successful cultivation.
Botrytis (Bud Rot):
Botrytis cinerea, commonly called bud rot or gray mold, is the most devastating fungal disease in cannabis cultivation. This fungus thrives in humidity above 50% combined with temperatures of 60-70°F. Dense flower clusters provide ideal conditions for botrytis development—the interior of dense buds can maintain high humidity even when ambient humidity is moderate.
Preventing botrytis requires maintaining humidity below 50% throughout flowering, ensuring adequate air circulation around and through the plant canopy, and avoiding water on flowers (never spray plants during flowering). Inspect plants regularly for early signs of infection (brown, mushy areas on buds).
Powdery Mildew:
Powdery mildew appears as white, powdery spots on leaves and stems. Unlike botrytis, powdery mildew can develop in moderate humidity (40-70%) and doesn’t require water on plant surfaces. However, high humidity (above 60%) significantly increases powdery mildew risk.
Preventing powdery mildew requires maintaining humidity below 55-60%, ensuring good air circulation, and maintaining appropriate temperature (powdery mildew thrives in 60-80°F). Some growers use sulfur burners or other preventative treatments in vegetative growth to prevent powdery mildew establishment.
Humidity Monitoring:
Accurate humidity monitoring is essential for mold prevention. Place hygrometers (humidity meters) at canopy level where conditions matter most. Humidity near the floor or ceiling may differ significantly from humidity at canopy level.
Monitor humidity continuously, not just occasionally. Humidity can spike during lights-off periods when temperature drops. These nighttime humidity spikes are particularly problematic for mold development. Automated controllers with continuous monitoring and data logging help identify humidity patterns and problems.
📂 Vapor Pressure Deficit (VPD) Explained
Vapor Pressure Deficit (VPD) is an advanced environmental metric that accounts for the relationship between temperature and humidity. Understanding and optimizing VPD allows for more precise environmental control than managing temperature and humidity independently.

Figure 2: VPD chart for cannabis showing optimal zones for different growth stages
What is VPD?
VPD measures the difference between the amount of moisture in the air and the maximum amount of moisture the air can hold at a given temperature. This difference drives transpiration—the process by which plants move water from roots through stems and leaves and into the atmosphere.
The Science Behind VPD:
Air can hold more moisture at higher temperatures. At 80°F, air can hold significantly more water vapor than at 60°F. This is why relative humidity (RH) alone doesn’t tell the complete story. Air at 80°F and 50% RH contains more actual moisture than air at 60°F and 50% RH, even though both have the same relative humidity.
VPD accounts for this temperature-humidity relationship by measuring the actual drying power of the air. High VPD means air has strong drying power (low humidity and/or high temperature), which increases transpiration. Low VPD means air has weak drying power (high humidity and/or low temperature), which reduces transpiration.
VPD Units:
VPD is measured in kilopascals (kPa) or millibars (mbar). Most cannabis growers use kPa. Optimal VPD for cannabis ranges from 0.4 kPa (seedlings) to 1.5 kPa (late flowering).
Optimal VPD Ranges
Different growth stages require different VPD ranges for optimal growth. These ranges balance transpiration rates with plant capabilities.
Seedling/Clone Stage:
Target VPD: 0.4-0.8 kPa
Young plants with undeveloped root systems need low VPD to minimize transpiration stress. Low VPD allows seedlings to focus energy on root development rather than moisture management. This typically corresponds to 75-80°F with 65-75% RH.
Vegetative Stage:
Target VPD: 0.8-1.1 kPa
Vegetative plants with established root systems benefit from moderate VPD that encourages healthy transpiration and nutrient uptake. This range supports rapid growth while strengthening plant structure. Typical conditions: 75-80°F with 55-65% RH.
Flowering Stage:
Target VPD: 1.0-1.5 kPa
Flowering plants benefit from higher VPD that reduces humidity while maintaining adequate transpiration. Higher VPD during flowering helps prevent mold while supporting continued nutrient uptake. Typical conditions: 70-78°F with 40-50% RH.
Some growers increase VPD further during late flowering (1.2-1.6 kPa) to stress plants and potentially increase resin production. However, excessive VPD can cause transpiration stress and should be approached carefully.
Using VPD Charts
VPD charts display the relationship between temperature, humidity, and VPD, allowing you to quickly determine VPD for any temperature/humidity combination.
Reading VPD Charts:
VPD charts show temperature on the vertical axis and relative humidity on the horizontal axis. The intersection of any temperature and humidity shows the corresponding VPD. Charts are typically color-coded with green zones indicating optimal VPD, yellow zones indicating acceptable VPD, and red zones indicating problematic VPD.
To use a VPD chart, measure your grow space temperature and humidity, find the intersection on the chart, and compare to optimal ranges for your growth stage. If VPD is too high, increase humidity or decrease temperature. If VPD is too low, decrease humidity or increase temperature.
Leaf Surface Temperature:
Advanced VPD management accounts for leaf surface temperature, which is typically 2-5°F cooler than air temperature due to transpiration. Some VPD charts and calculators use leaf temperature rather than air temperature for more accurate VPD calculation.
Measure leaf temperature using infrared thermometers. If leaf temperature is significantly cooler than air temperature (more than 5°F difference), your VPD is higher than calculations based on air temperature suggest. This can indicate excessive transpiration stress.
VPD vs Temperature/Humidity
Why use VPD instead of managing temperature and humidity independently? VPD provides several advantages for environmental management.
More Accurate Environmental Assessment:
Temperature and humidity affect plants together, not independently. Air at 80°F and 50% RH affects plants very differently than air at 70°F and 50% RH, even though both have the same relative humidity. VPD accounts for this relationship, providing a more accurate assessment of environmental conditions.
Simplified Environmental Management:
Rather than managing two variables (temperature and humidity) independently, VPD allows you to manage one variable that accounts for both. This simplifies decision-making—if VPD is too high, you know you need to increase humidity or decrease temperature. If VPD is too low, you need to decrease humidity or increase temperature.
Optimization of Transpiration:
VPD directly relates to transpiration rates, which drive nutrient uptake and plant health. By managing VPD, you’re directly managing transpiration rather than indirectly managing it through temperature and humidity. This allows more precise optimization of plant physiology.
When to Use VPD:
VPD is most valuable for experienced growers seeking to optimize environmental conditions. Beginning growers can achieve good results by managing temperature and humidity using the ranges provided earlier in this guide. As you gain experience and want to fine-tune conditions, learning to manage VPD provides an additional level of precision.
Modern smart controllers can manage VPD automatically, making VPD-based climate control accessible even to less experienced growers. These controllers adjust multiple devices to maintain target VPD, eliminating the need for manual calculations and adjustments.
📂 Dehumidifiers: Selection and Sizing
Dehumidifiers are essential equipment for cannabis cultivation, particularly during flowering when plants transpire large amounts of water. Understanding dehumidifier types, sizing requirements, and operation ensures you can maintain optimal humidity throughout the grow cycle.
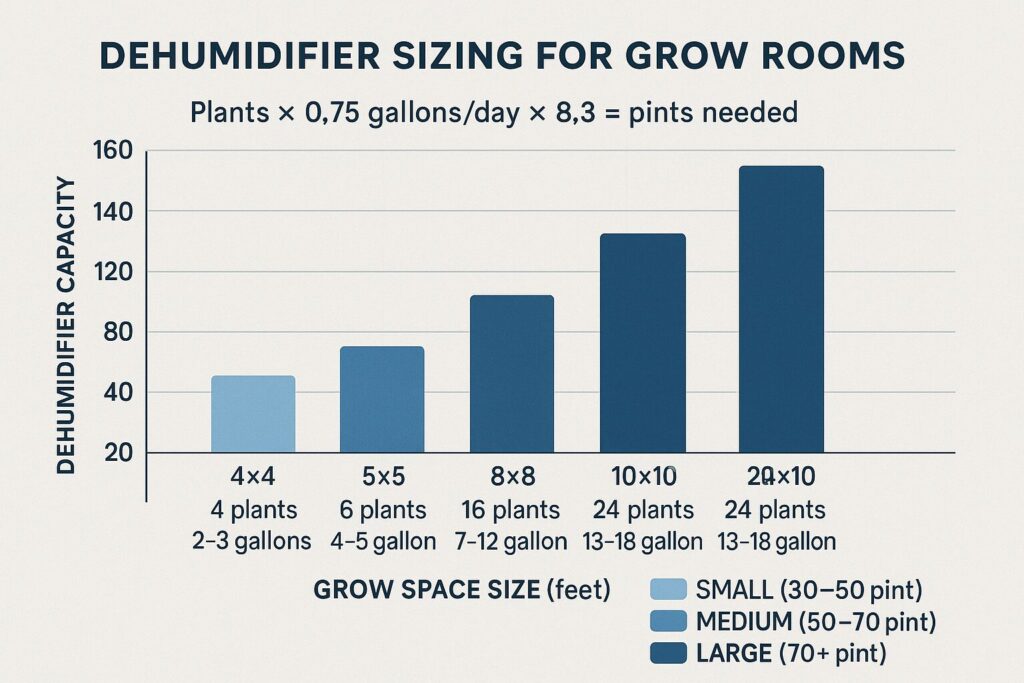
Figure 3: Dehumidifier capacity requirements for different grow space sizes and plant counts
Why Dehumidifiers Are Essential
Cannabis plants transpire significant amounts of water, particularly during flowering. A single flowering plant can transpire 0.5-1 gallon of water per day depending on size, environmental conditions, and growth stage. This water enters the air as vapor, raising humidity.
Humidity Without Dehumidification:
Without dehumidification, humidity in a sealed grow space will rise to problematic levels within hours. For example, four flowering plants in a 4×4 tent transpiring 0.75 gallons each per day add 3 gallons of water to the air daily. This is equivalent to 25 pints of water—more than most small dehumidifiers can remove.
The result of inadequate dehumidification is humidity above 60-70%, creating ideal conditions for mold and mildew. Many growers who experience bud rot or powdery mildew problems have inadequate dehumidification rather than other environmental issues.
Dehumidification vs Ventilation:
Some growers attempt to control humidity through ventilation alone, exhausting humid air and replacing it with drier air from outside the grow space. This works only if ambient humidity is low. In humid climates or during humid seasons, ventilation may bring in air that’s as humid as grow space air, providing no humidity reduction.
Dehumidification is necessary when ambient humidity is high (above 50-60%), when growing in sealed or semi-sealed spaces, or during flowering when humidity control is critical. Most serious growers use both ventilation and dehumidification for optimal humidity management.
Dehumidifier Types
Three main dehumidifier types are available, each with different operating principles, advantages, and applications.
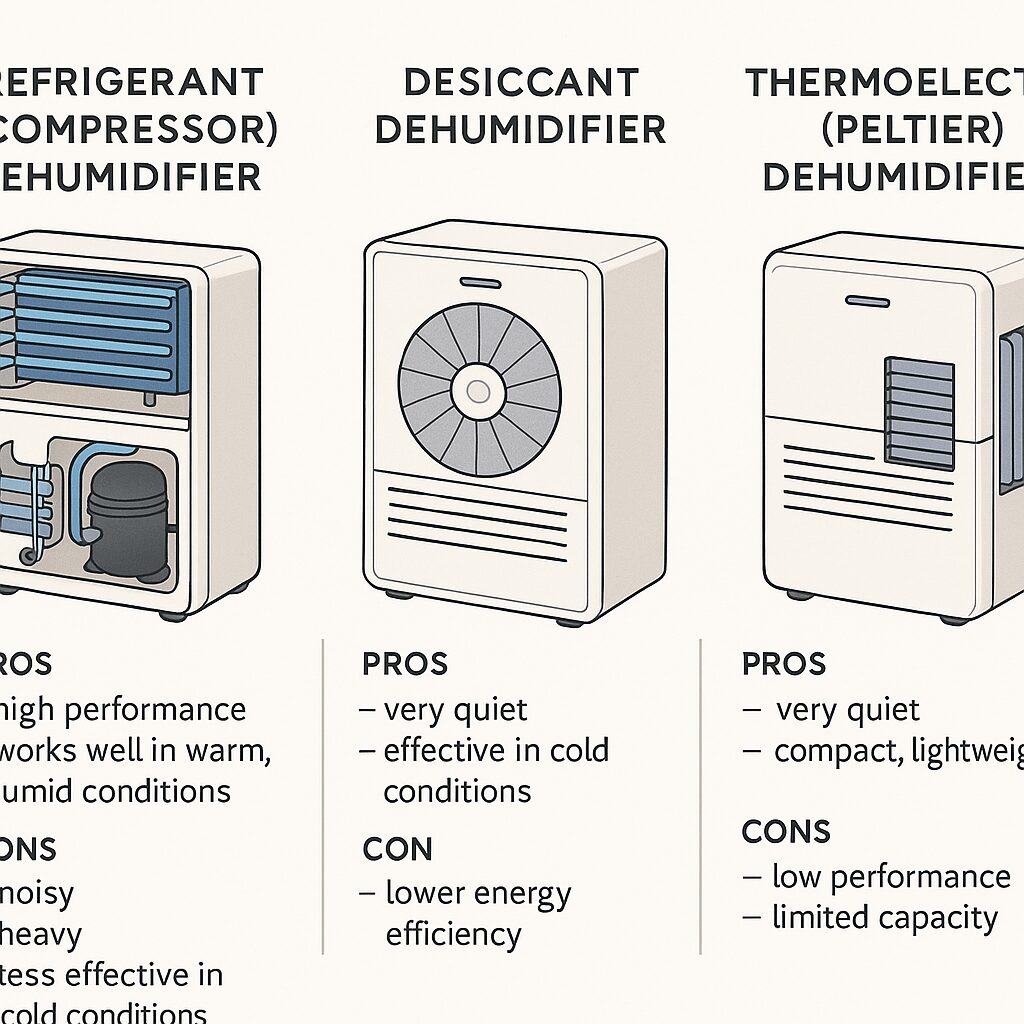
Figure 4: Comparison of refrigerant, desiccant, and thermoelectric dehumidifier technologies
Refrigerant (Compressor) Dehumidifiers:
Refrigerant dehumidifiers are the most common type for grow room applications. These units work like air conditioners, using a compressor and refrigerant to cool air below its dew point, causing moisture to condense and drain away.
Advantages include high capacity (30-70+ pints per day for home models), good energy efficiency, and effective operation in warm, humid conditions (70-90°F). Disadvantages include noise from compressor operation, heat generation (dehumidifiers add heat to the space), and reduced effectiveness in cool conditions (below 65°F).
Refrigerant dehumidifiers are the best choice for most cannabis growing applications. They provide adequate capacity at reasonable cost and work well in the warm temperatures typical of grow rooms.
Desiccant Dehumidifiers:
Desiccant dehumidifiers use moisture-absorbing materials (desiccants) to remove humidity. Air passes through a rotating desiccant wheel that absorbs moisture, then the wheel rotates through a heating section that drives off moisture for disposal.
Advantages include very quiet operation, effectiveness in cold conditions (down to 35°F), and no compressor to fail. Disadvantages include lower energy efficiency than refrigerant models, lower capacity for size, and higher cost.
Desiccant dehumidifiers are best for cold environments where refrigerant dehumidifiers don’t work effectively, situations where quiet operation is critical, and commercial applications where higher cost is justified by performance.
Thermoelectric (Peltier) Dehumidifiers:
Thermoelectric dehumidifiers use Peltier cooling to create a cold surface where moisture condenses. These units have no compressor or moving parts beyond a small fan.
Advantages include very quiet operation, compact size, and low cost. Disadvantages include very low capacity (typically 10-20 ounces per day), ineffectiveness in warm conditions, and poor energy efficiency.
Thermoelectric dehumidifiers are not suitable for cannabis cultivation. Their capacity is far too low to manage transpiration from even a single plant. Avoid these units despite their low cost—they cannot provide adequate dehumidification.
Sizing Dehumidifiers
Proper dehumidifier sizing is critical for maintaining optimal humidity. Undersized dehumidifiers run continuously without achieving target humidity, while oversized dehumidifiers cycle on and off frequently, reducing efficiency and lifespan.
Sizing Based on Plant Transpiration:
The most accurate sizing method calculates water removal needs based on plant transpiration. Estimate that each flowering plant transpires 0.5-1 gallon per day depending on size and conditions. Multiply plant count by average transpiration to get daily water addition.
Convert gallons to pints (1 gallon = 8.3 pints) to match dehumidifier capacity ratings. Add 20-30% safety margin to account for variability and ensure adequate capacity. For example, four plants transpiring 0.75 gallons each: 4 plants × 0.75 gallons × 8.3 = 25 pints per day. With 30% safety margin: 25 × 1.3 = 32 pints required capacity.
Sizing Based on Room Size:
Dehumidifier manufacturers provide sizing guidelines based on room size and humidity level. These guidelines assume typical residential conditions and may not account for the high moisture loads from transpiring plants.
For grow rooms, use manufacturer recommendations for “very wet” or “extremely wet” conditions even if your space would normally be considered “moderately wet.” The high transpiration rates from cannabis plants create moisture loads similar to very wet basements or other high-moisture environments.
Practical Sizing Guidelines:
For small grow tents (2×2 to 4×4 with 1-4 plants), use 30-50 pint capacity dehumidifiers. For medium tents (4×8 to 5×5 with 4-8 plants), use 50-70 pint capacity dehumidifiers. For large tents and small rooms (8×8 to 10×10 with 8-16 plants), use 70+ pint capacity dehumidifiers or multiple smaller units.
For large grow rooms (10×10+), consider commercial dehumidifiers rated for 100+ pints per day or multiple residential units distributed throughout the space.
Placement and Operation
Proper dehumidifier placement and operation maximizes effectiveness and efficiency.
Placement:
Place dehumidifiers outside the grow tent if possible to avoid adding heat to the growing environment. Connect the dehumidifier to the tent using ducting—pull air from the tent, dehumidify it, and return dry air to the tent. This configuration removes moisture without adding heat.
If you must place the dehumidifier inside the grow space, position it where it won’t blow directly on plants and ensure adequate clearance for airflow. Most dehumidifiers need 12-18 inches of clearance on all sides for proper operation.
Drainage:
Dehumidifiers collect condensed water in reservoirs that must be emptied regularly. For continuous operation, use gravity drain or pump drain options if available. Connect a drain hose to the dehumidifier and route it to a drain or collection container.
Gravity drain requires the drain point to be lower than the dehumidifier. If this isn’t possible, choose a dehumidifier with a built-in condensate pump that can pump water upward to a drain point. This eliminates the need to empty reservoirs and allows continuous operation.
Temperature Considerations:
Refrigerant dehumidifiers work best in warm conditions (70-85°F). Effectiveness decreases significantly below 65°F. If your grow space runs cool, choose a dehumidifier rated for low-temperature operation or consider a desiccant dehumidifier.
Many dehumidifiers include auto-defrost features that prevent ice buildup on cooling coils in cool conditions. This feature is valuable for grow rooms where temperature drops during lights-off periods.
Maintenance:
Clean dehumidifier filters monthly to maintain airflow and efficiency. Most dehumidifiers have washable filters that can be rinsed and reused. Empty and clean water reservoirs regularly to prevent mold and bacteria growth. If using continuous drain, check drain lines periodically to ensure they’re not clogged.
📂 Humidifiers: Adding Moisture
While dehumidifiers remove moisture, humidifiers add moisture to the air. Humidifiers are necessary during vegetative growth in dry climates or during winter when indoor air is very dry.
When Humidifiers Are Needed
Humidifiers are necessary when ambient humidity is below target levels for your growth stage. This commonly occurs in dry climates (desert regions, high altitude areas), during winter when heating dries indoor air, or in spaces with high ventilation rates that bring in dry air.
Assessing Humidifier Needs:
Monitor humidity in your grow space without plants to determine baseline humidity. If ambient humidity is below 40-50%, you’ll likely need humidification during vegetative growth. If ambient humidity is below 30%, you’ll definitely need humidification.
During flowering, humidifiers are rarely needed because target humidity (40-50%) is achievable through ventilation in most climates. If your ambient humidity is extremely low (below 30%), you may need slight humidification even during flowering to prevent excessive transpiration stress.
Humidifier Types
Several humidifier types are available, each with different operating principles and applications.
Ultrasonic Humidifiers:
Ultrasonic humidifiers use high-frequency vibrations to create a fine mist of water droplets. These units are quiet, energy-efficient, and produce cool mist that doesn’t add heat to the grow space.
Advantages include very quiet operation, low energy consumption, cool mist that doesn’t raise temperature, and compact size. Disadvantages include potential for white dust if using hard water (use distilled or RO water), need for regular cleaning to prevent bacteria growth, and limited capacity for large spaces.
Ultrasonic humidifiers are the most popular choice for grow rooms. They provide adequate capacity for small to medium spaces, operate quietly, and don’t add heat.
Evaporative Humidifiers:
Evaporative humidifiers blow air through a wet wick or filter, causing water to evaporate into the air. These units are simple, reliable, and self-regulating (they automatically reduce output as humidity rises).
Advantages include no white dust (minerals stay in the wick), self-regulating output, and simple, reliable operation. Disadvantages include noise from fan operation, need to replace wicks periodically, and limited capacity.
Evaporative humidifiers work well for grow rooms but are less popular than ultrasonic models due to noise and maintenance requirements.
Warm Mist Humidifiers:
Warm mist humidifiers boil water to create steam. These units are effective but add heat to the grow space.
Advantages include very effective humidification and bacteria-free output (boiling kills bacteria). Disadvantages include heat addition to grow space, high energy consumption, and potential safety concerns (hot water and steam).
Warm mist humidifiers are not recommended for grow rooms because they add unwanted heat. Use cool mist options instead.
Sizing and Placement
Humidifier capacity is rated in gallons per day or milliliters per hour. Size humidifiers based on room volume and how much you need to raise humidity.
Sizing Guidelines:
For small grow tents (2×2 to 4×4), use humidifiers rated for 1-2 gallons per day. For medium tents (4×8 to 5×5), use 2-3 gallons per day capacity. For large tents and rooms (8×8+), use 3-6+ gallons per day or multiple smaller units.
Start with smaller capacity and add more if needed. It’s easier to add humidification capacity than to deal with excessive humidity from oversized humidifiers.
Placement:
Place humidifiers where mist or humid air can circulate throughout the grow space. Don’t point humidifiers directly at plants—the mist can cause water spots on leaves. Position humidifiers near circulation fans so humid air is distributed evenly.
If placing humidifiers inside grow tents, ensure they don’t create wet spots on tent floors or walls. Elevate humidifiers on platforms or stands to improve air circulation around the unit.
Operation:
Run humidifiers continuously during vegetative growth if needed to maintain target humidity. Use controllers with humidity sensors to automate humidifier operation—the controller turns the humidifier on when humidity drops below the setpoint and off when target humidity is reached.
Clean humidifiers weekly to prevent bacteria and mold growth. Use distilled or RO water in ultrasonic humidifiers to prevent white dust. Empty and refill humidifiers daily to prevent stagnant water.
📂 Air Conditioners: Cooling Solutions
Air conditioners are necessary when ventilation alone cannot maintain optimal temperatures. Understanding AC types and sizing helps you select appropriate cooling solutions for your grow space.
When AC Is Necessary
Air conditioning is necessary when ambient temperature is too high for optimal growing, grow lights generate more heat than ventilation can remove, or you’re growing in sealed or semi-sealed spaces where ventilation is limited.
Assessing AC Needs:
Monitor grow space temperature with lights on and ventilation running at maximum. If temperature exceeds 85°F, you need additional cooling. If temperature is 80-85°F, you’re borderline—AC may be necessary during hot weather or summer months.
Consider your climate and season. Many growers need AC during summer but not during cooler months. Portable AC units allow seasonal use without permanent installation.
Portable vs Mini-Split Systems
Two main AC types are practical for grow room applications: portable units and mini-split systems.
Portable Air Conditioners:
Portable AC units are self-contained systems that sit inside or near the grow space. These units draw in warm air, cool it, and exhaust hot air through a duct that vents outside.
Advantages include no permanent installation required, portability between spaces, and lower upfront cost ($300-600 for home units). Disadvantages include lower efficiency than mini-splits, noise from compressor operation, need to vent hot exhaust air, and limited capacity (typically 8,000-14,000 BTU for home units).
Portable AC units work well for small to medium grow tents and rooms where permanent installation isn’t possible. They’re also good for seasonal use when AC is only needed during hot months.
Mini-Split Systems:
Mini-split systems consist of an outdoor compressor unit and one or more indoor air handler units. These systems are permanently installed and provide efficient, quiet cooling.
Advantages include high efficiency (lower operating costs), quiet operation (compressor is outside), high capacity (12,000-36,000+ BTU common), and ability to cool multiple spaces with multi-zone systems. Disadvantages include high upfront cost ($1,500-3,000+ installed), permanent installation required, and need for professional installation in most cases.
Mini-split systems are best for dedicated grow rooms where permanent installation is acceptable, large spaces requiring high cooling capacity, and situations where operating cost and efficiency matter more than upfront cost.
Sizing Air Conditioners
AC capacity is rated in BTU (British Thermal Units) per hour. Proper sizing ensures adequate cooling without excessive cost.
Basic Sizing:
Start with room volume: calculate cubic feet (length × width × height). Multiply by 3-4 BTU per cubic foot for basic cooling needs. Add 1,000-1,500 BTU for each 1,000W of lighting. Add 20% safety margin for hot climates or poor insulation.
For example, an 8×8×8 room (512 cubic feet) with 2,000W of LED lighting: 512 × 3.5 = 1,792 BTU for room, 2,000W lighting = 2,000-3,000 BTU, total = 3,792-4,792 BTU base. With 20% safety margin: 4,550-5,750 BTU needed. A 6,000-8,000 BTU unit would be appropriate.
Practical Sizing Guidelines:
For small grow tents (2×2 to 4×4), 5,000-8,000 BTU portable units are typically adequate. For medium tents (4×8 to 5×5), 8,000-10,000 BTU units work well. For large tents and small rooms (8×8 to 10×10), 10,000-14,000 BTU portable units or 12,000-18,000 BTU mini-splits are appropriate. For large rooms (10×10+), 18,000-36,000+ BTU mini-splits or multiple smaller units are necessary.
📂 Heaters: Temperature Maintenance
Heaters are necessary in cold climates or during winter when ambient temperature drops below optimal ranges. Understanding heater types and safety considerations ensures safe, effective heating.
Heating Requirements
Heating is necessary when ambient temperature drops below 60-65°F, particularly during lights-off periods when grow lights aren’t generating heat. Cold temperatures slow growth and can cause stress and nutrient uptake problems.
Assessing Heating Needs:
Monitor grow space temperature during lights-off periods in cold weather. If temperature drops below 60°F, heating is necessary. If temperature is 60-65°F, heating may be beneficial for optimal growth.
Many growers need heating only during lights-off periods. Grow lights generate sufficient heat during lights-on, but temperature drops when lights turn off. Automated controllers can activate heaters only during lights-off, minimizing energy use.
Heater Types
Several heater types are suitable for grow room applications.
Electric Space Heaters:
Electric space heaters are the most common heating solution for grow rooms. These units use electric heating elements to warm air, with fans to distribute heated air.
Advantages include low cost ($30-100 for home units), portable and easy to use, and thermostatic control on most models. Disadvantages include high energy consumption, fire risk if used improperly, and dry air (reduces humidity).
Choose space heaters with automatic shut-off features (tip-over protection, overheat protection) for safety. Never leave space heaters unattended or place them near flammable materials.
Oil-Filled Radiator Heaters:
Oil-filled radiators use electric heating elements to warm oil inside the unit. The heated oil radiates warmth without fans.
Advantages include silent operation (no fan), gentler heat that doesn’t dry air as much, and safer operation (cooler surface temperatures). Disadvantages include slower heat-up time, higher cost than space heaters, and heavy weight.
Oil-filled radiators are good choices for grow rooms where quiet operation is important and rapid heating isn’t necessary.
Tube Heaters:
Tube heaters are long, narrow heaters designed to provide gentle, even heating. These units are popular in greenhouses and can work well in grow rooms.
Advantages include even heat distribution, gentle warming that doesn’t create hot spots, and safe operation (low surface temperature). Disadvantages include limited capacity (best for maintaining temperature, not raising it quickly) and higher cost than space heaters.
Safety Considerations
Heaters present fire and safety risks that must be managed carefully.
Fire Safety:
Never place heaters near flammable materials (plants, tents, curtains). Maintain at least 3 feet of clearance around heaters. Use heaters with automatic shut-off features (tip-over protection, overheat protection). Never run heaters unattended for extended periods.
Plug heaters directly into wall outlets, not extension cords or power strips. Heaters draw high current that can overload extension cords, creating fire risk.
Electrical Safety:
Ensure your electrical system can handle heater load. Most space heaters draw 1,000-1,500 watts (8-12 amps at 120V). Don’t run multiple high-wattage devices on the same circuit.
Use heaters with grounded plugs (three-prong) and GFCI protection if available. Never use damaged heaters or heaters with frayed cords.
Humidity Management:
Heaters reduce humidity by warming air (warm air holds more moisture, so relative humidity drops). If using heaters, monitor humidity and increase humidification if necessary to maintain target levels.
📂 Controllers and Automation
Automated climate control eliminates the need for constant manual monitoring and adjustment. Understanding controller types and capabilities helps you select appropriate automation for your needs.
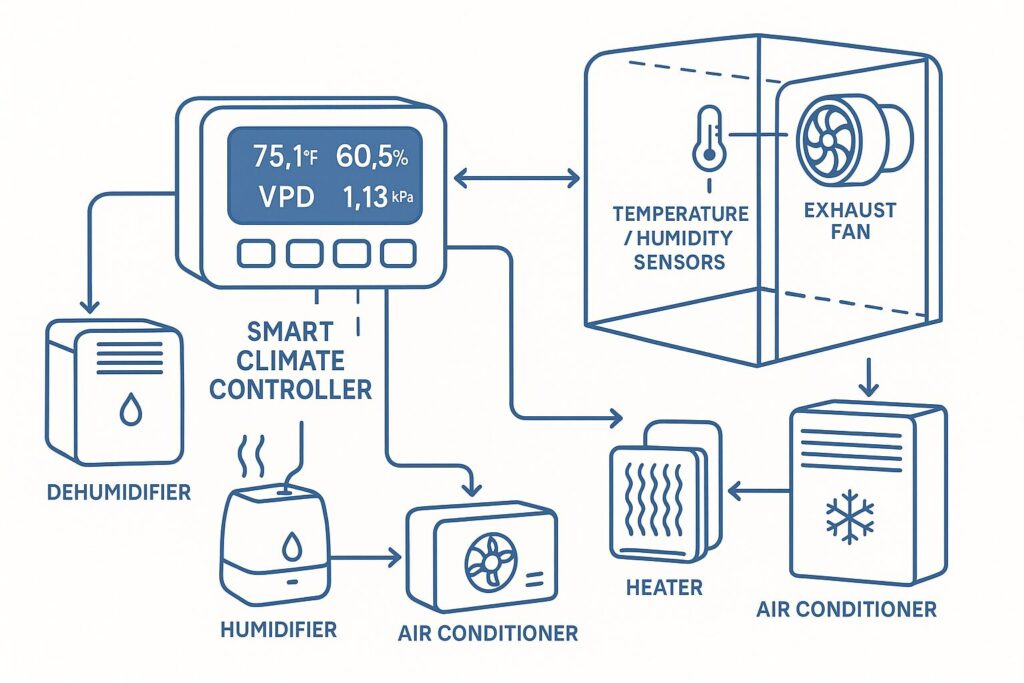
Figure 5: Smart climate controller managing multiple devices based on temperature, humidity, and VPD sensors
Manual vs Automatic Control
Manual climate control requires you to monitor conditions and adjust equipment settings as needed. This works for small grows where you can check conditions multiple times daily, but it’s time-consuming and prone to errors.
Automatic control uses controllers with sensors to monitor conditions and adjust equipment automatically. Controllers turn devices on and off based on setpoints you configure, maintaining optimal conditions 24/7 without manual intervention.
Benefits of Automation:
Automation provides consistent environmental conditions without manual monitoring, prevents environmental swings that stress plants, allows you to leave your grow unattended without worry, and provides data logging to track conditions over time.
The investment in quality controllers pays for itself through improved results and peace of mind. Many crop failures result from environmental problems that automation would have prevented.
Controller Types
Several controller types are available, from simple single-device controllers to sophisticated multi-device systems.
Single-Device Controllers:
Single-device controllers manage one piece of equipment. Examples include humidistats that control humidifiers or dehumidifiers, thermostats that control heaters or AC units, and timer-based controllers for fans.
Advantages include low cost ($20-50 per controller), simple setup and operation, and adequate for basic needs. Disadvantages include need for multiple controllers to manage multiple devices, no coordination between devices, and limited features.
Single-device controllers work well for simple setups or as additions to existing systems. However, multi-device controllers provide better value for complete climate management.
Multi-Device Controllers:
Multi-device controllers manage multiple pieces of equipment from a single control unit. These controllers have multiple outlets that turn on and off based on sensor readings and programmed logic.
Advantages include coordinated control of multiple devices, single interface for all climate management, and more sophisticated control logic. Disadvantages include higher cost ($100-300+) and more complex setup.
Multi-device controllers are the best choice for serious growers who want comprehensive climate management. These controllers can manage dehumidifiers, humidifiers, heaters, AC units, and fans from a single interface.
Smart Controllers
Smart controllers represent the latest evolution in climate control technology. These controllers offer advanced features including VPD-based control, smartphone app integration, cloud data logging, and programmable schedules.
Leading Smart Controller Brands:
AC Infinity offers the Controller 69 and Controller 67 systems that manage multiple fans and climate devices. These controllers calculate and maintain target VPD automatically, provide smartphone app control and monitoring, and log environmental data to the cloud.
Trolmaster offers the Hydro-X system, a modular controller that can manage dozens of devices. This professional-grade system is popular in commercial grows but accessible to home growers.
Pulse offers environmental monitoring with smartphone alerts and data logging. While not a controller (it doesn’t control devices), Pulse provides valuable monitoring and insights.
Smart Controller Features:
VPD calculation and control automatically maintains optimal VPD by adjusting multiple devices. Smartphone apps allow remote monitoring and control from anywhere. Cloud data logging tracks conditions over time and identifies patterns. Programmable schedules adjust setpoints based on time of day or growth stage. Alerts notify you of problems via smartphone notifications.
Smart Controller Value:
Smart controllers cost more than basic controllers ($150-400+) but provide professional-level control and monitoring. For serious growers, the investment is worthwhile for the improved results and peace of mind.
Integration and Setup
Setting up automated climate control involves connecting devices to controllers, configuring setpoints, and testing operation.
Basic Setup:
Connect sensors to the controller and place them at canopy level in the grow space. Plug climate devices (dehumidifier, humidifier, heater, AC, fans) into controller outlets. Configure setpoints for temperature, humidity, or VPD based on your growth stage. Test operation by manually triggering devices to ensure they respond correctly.
Advanced Setup:
Program schedules to adjust setpoints based on time of day (lights-on vs lights-off). Configure VPD targets that automatically adjust temperature and humidity together. Set up smartphone alerts for out-of-range conditions. Enable data logging to track conditions and identify patterns.
Optimization:
Monitor conditions for several days and adjust setpoints as needed. Fine-tune device settings (dehumidifier speed, fan speed) for optimal performance. Review data logs to identify patterns and problems. Adjust schedules to match plant responses.
🔧 Monitoring Equipment
Accurate environmental monitoring is essential for climate control. Understanding monitoring equipment helps you track conditions and identify problems.
Temperature and Humidity Meters
Basic thermometer/hygrometer combinations measure temperature and humidity. These simple meters are essential for any grow operation.
Digital Meters:
Digital meters provide accurate readings and often include min/max memory that tracks highest and lowest values. This helps identify environmental swings that occur when you’re not monitoring.
Choose meters with ±2% humidity accuracy and ±1°F temperature accuracy. Less accurate meters may provide misleading readings that result in suboptimal environmental control.
Placement:
Place meters at canopy level where conditions matter most. Temperature and humidity can vary significantly between floor level, canopy level, and ceiling level. Multiple meters in different locations help identify environmental variations within the grow space.
Data Logging
Data logging meters record temperature and humidity over time, allowing you to review historical conditions and identify patterns.
Benefits of Data Logging:
Data logging reveals environmental patterns you might miss with spot checks. You can identify humidity spikes during lights-off, temperature swings when equipment cycles, and long-term trends that affect plant health.
Many data loggers connect to computers or smartphones, allowing you to review data graphically and export it for analysis. This is valuable for troubleshooting problems and optimizing environmental control.
Multiple Sensor Systems
Advanced monitoring systems use multiple sensors throughout the grow space to provide comprehensive environmental data.
Wireless Sensor Networks:
Systems like Pulse use wireless sensors placed throughout the grow space. These sensors report data to a central hub that displays conditions and logs data to the cloud. Smartphone apps provide real-time monitoring and historical data review.
Multiple sensors reveal environmental variations within the grow space. You might discover that one corner runs warmer or more humid than the rest, allowing you to adjust airflow or equipment placement to improve uniformity.
📂 Complete Climate System Design
Designing a complete climate control system involves selecting appropriate equipment, sizing for your space, and integrating components for optimal performance.
System Components
A complete climate control system includes all equipment necessary to maintain optimal temperature and humidity throughout the grow cycle.
Essential Components:
Dehumidifier (sized for plant count and transpiration), temperature and humidity controller (preferably smart controller with VPD capability), temperature and humidity sensors (placed at canopy level), and ventilation system (see our Ventilation Guide for details).
Conditional Components:
Air conditioner (if ambient temperature is too high), heater (if ambient temperature is too low during lights-off), humidifier (if ambient humidity is too low during vegetative growth), and additional sensors for monitoring multiple locations.
Sizing for Your Space
Proper equipment sizing ensures your climate system can maintain optimal conditions under all circumstances.
Small Grow Tent (2×2 to 4×4, 1-4 plants):
30-50 pint dehumidifier, 1-2 gallon/day humidifier (if needed), 5,000-8,000 BTU portable AC (if needed), 1,000-1,500W space heater (if needed), and single-device or basic multi-device controller.
Medium Grow Tent (4×8 to 5×5, 4-8 plants):
50-70 pint dehumidifier, 2-3 gallon/day humidifier (if needed), 8,000-12,000 BTU portable AC (if needed), 1,500W space heater (if needed), and multi-device or smart controller.
Large Tent/Small Room (8×8 to 10×10, 8-16 plants):
70+ pint dehumidifier or multiple units, 3-6 gallon/day humidifier (if needed), 12,000-18,000 BTU mini-split AC (if needed), 1,500W space heater or multiple units (if needed), and smart controller with VPD capability.
Installation and Configuration
Proper installation and configuration ensures your climate system operates effectively.
Installation Steps:
Install ventilation system first (see Ventilation Guide). Place dehumidifier outside grow space if possible, with ducting to pull air from tent. Install AC unit with proper exhaust venting. Place heater in safe location with adequate clearance. Install humidifier where mist can circulate without hitting plants directly. Mount sensors at canopy level in representative locations.
Configuration:
Configure controller setpoints based on growth stage (see optimal ranges earlier in this guide). Set up schedules to adjust setpoints for lights-on vs lights-off periods. Configure VPD targets if using smart controller. Enable alerts for out-of-range conditions. Test all devices to ensure they respond to controller commands.
Optimization:
Monitor conditions for several days and adjust setpoints as needed. Review data logs to identify patterns and problems. Fine-tune device settings for optimal performance. Adjust based on plant responses—if plants show stress, adjust environmental conditions.
📊 Brand Comparison
Climate control equipment is available from numerous manufacturers at various price points and quality levels. Understanding brand characteristics helps you select equipment that matches your needs and budget.
Premium Brands
Quest:
Quest specializes in commercial-grade dehumidifiers designed specifically for grow rooms. Their units feature high capacity (100-500+ pints per day), hot gas reheat that minimizes temperature rise, and built-in controls for automated operation.
Quest dehumidifiers are expensive ($2,000-10,000+) but provide professional-level performance and reliability. They’re the standard in commercial cannabis cultivation but are overkill for most home grows.
Santa Fe:
Santa Fe manufactures high-performance dehumidifiers for residential and commercial applications. Their units offer excellent efficiency, quiet operation, and long lifespan.
Santa Fe dehumidifiers cost $1,500-3,000+ but provide superior performance compared to consumer-grade units. They’re worthwhile for serious home growers and small commercial operations.
Mitsubishi / Daikin:
These brands manufacture premium mini-split AC systems known for efficiency, reliability, and quiet operation. Their systems cost more than budget brands but provide superior performance and longevity.
Mid-Range Brands
Frigidaire / GE:
These major appliance manufacturers offer reliable dehumidifiers at mid-range prices ($200-400 for 50-70 pint models). Their units provide adequate performance for home growing applications with reasonable efficiency and reliability.
hOmeLabs / Vremi:
These brands offer good-value dehumidifiers popular among home growers. Units cost $180-350 for 50-70 pint models and provide adequate performance, though not as refined as premium brands.
Pioneer / MRCOOL:
These brands offer affordable mini-split AC systems ($800-1,500 for 12,000-18,000 BTU) that provide good value for home installations. Quality and efficiency are adequate though not exceptional.
Budget Brands
Eva-Dry / Pro Breeze:
Budget dehumidifier brands offering units at $120-250 for 30-50 pint models. Quality is acceptable for light use, but expect shorter lifespan and less efficient operation than mid-range brands.
Generic Portable AC:
Numerous generic portable AC brands are available through Amazon and other retailers at $250-400 for 8,000-10,000 BTU units. Quality varies significantly—read reviews carefully before purchasing.
📂 Common Climate Control Mistakes
Even experienced growers make climate control mistakes that compromise results. Understanding common pitfalls helps you avoid these problems.
Undersizing Dehumidifiers:
The most common mistake is choosing dehumidifiers with insufficient capacity for plant transpiration. Growers often size based on room dimensions without accounting for the massive moisture loads from flowering plants. Always size dehumidifiers based on plant count and transpiration rates, not just room size.
Ignoring VPD:
Many growers manage temperature and humidity independently without considering their relationship. This can result in conditions that seem acceptable individually but create suboptimal VPD. Learning to manage VPD provides more precise environmental control.
Inadequate Monitoring:
Spot-checking conditions once or twice daily doesn’t reveal environmental swings that occur between checks. Use continuous monitoring with data logging to identify patterns and problems you’d otherwise miss.
Poor Sensor Placement:
Placing sensors at floor level or near equipment rather than at canopy level provides misleading readings. Conditions where sensors are placed may differ significantly from conditions where plants are growing.
Neglecting Lights-Off Conditions:
Many growers focus on lights-on conditions and ignore lights-off periods. Temperature drops and humidity spikes during lights-off can cause significant problems. Monitor and control conditions 24/7, not just during lights-on.
Inadequate Automation:
Relying on manual control requires constant attention and is prone to errors. Investing in quality automated controllers eliminates these problems and provides consistent environmental management.
📂 Maintenance and Troubleshooting
Regular maintenance keeps climate control equipment operating efficiently. Understanding common problems and solutions helps you troubleshoot issues quickly.
Dehumidifier Maintenance:
Clean filters monthly to maintain airflow and efficiency. Empty and clean water reservoirs weekly to prevent mold and bacteria. Check drain lines periodically if using continuous drain. Vacuum cooling coils annually to remove dust buildup.
AC Maintenance:
Clean or replace filters monthly. Clean outdoor condenser coils annually (mini-splits). Ensure drain lines are clear and draining properly. Check refrigerant levels if cooling performance declines.
Humidifier Maintenance:
Clean humidifiers weekly to prevent bacteria and mold growth. Use distilled or RO water in ultrasonic humidifiers to prevent white dust. Replace wicks or filters as recommended by manufacturer (evaporative humidifiers).
Controller Maintenance:
Calibrate sensors annually using reference standards or by comparison with known-accurate meters. Replace sensor batteries as needed. Update controller firmware when updates are available.
Troubleshooting High Humidity:
If humidity remains high despite dehumidifier operation, check that the dehumidifier has adequate capacity for your plant count, verify the dehumidifier is operating correctly (not full, not frozen), ensure adequate air circulation to move humid air to dehumidifier, and check for water leaks or other moisture sources.
Troubleshooting Low Humidity:
If humidity is too low, reduce ventilation rate to retain more moisture, add or increase humidifier capacity, check for air leaks that bring in dry air, and verify sensors are reading accurately.
Troubleshooting Temperature Problems:
If temperature is too high, increase ventilation or AC capacity, reduce lighting intensity if possible, ensure AC is operating correctly, and check that heat from dehumidifiers isn’t overwhelming cooling capacity.
If temperature is too low, reduce ventilation rate, add or increase heater capacity, check that AC isn’t overcooling, and ensure heaters are operating correctly.
💡 Budget Recommendations
Climate control equipment is available at every price point. Understanding what different price ranges offer helps you make informed decisions.
Minimum Budget ($300-500):
Basic digital thermometer/hygrometer ($15-30), mid-range 50-pint dehumidifier ($200-300), single-device humidity controller ($30-50), and basic space heater if needed ($30-80).
This minimum setup provides essential dehumidification and monitoring. It’s adequate for small grows in moderate climates but lacks automation and may struggle in challenging conditions.
Recommended Budget ($600-1,000):
Quality digital meters with data logging ($50-100), quality 50-70 pint dehumidifier ($250-400), multi-device controller or basic smart controller ($100-200), humidifier if needed ($40-80), portable AC if needed ($300-500), and space heater if needed ($50-100).
This setup provides comprehensive climate control with basic automation. It’s suitable for most home growing applications and provides good value for the investment.
Premium Budget ($1,500-3,000+):
Smart controller with VPD capability ($150-400), premium dehumidifier or commercial unit ($400-2,000+), mini-split AC system if needed ($1,500-3,000+), quality humidifier ($80-150), and wireless sensor network ($200-300).
Premium setups provide professional-level control and monitoring with comprehensive automation. The investment is worthwhile for serious growers seeking maximum yields and quality.
❓ Frequently Asked Questions
❓ What is VPD and do I need to manage it?
VPD (Vapor Pressure Deficit) measures the drying power of air by accounting for both temperature and humidity. While you can achieve good results managing temperature and humidity independently, VPD provides more precise environmental control. Advanced growers benefit from VPD management, particularly when using smart controllers that can maintain target VPD automatically.
❓ How do I size a dehumidifier for my grow?
Calculate based on plant transpiration: estimate 0.5-1 gallon per plant per day during flowering, multiply by plant count, convert to pints (1 gallon = 8.3 pints), and add 20-30% safety margin. For example, 4 plants × 0.75 gallons × 8.3 = 25 pints, plus 30% = 32 pints needed capacity.
❓ Can I use a portable AC in a grow tent?
Yes, portable AC units work well in grow tents. Place the AC outside the tent and duct cool air into the tent, or place it inside if space allows. Ensure you properly vent the hot exhaust air outside the tent—never exhaust hot air back into the tent or surrounding room.
❓ Do I need a humidifier during flowering?
Usually not. Target humidity during flowering (40-50%) is achievable through ventilation in most climates. Humidifiers are typically only needed during vegetative growth when target humidity is higher (50-60%). If your ambient humidity is extremely low (below 30%), you may need slight humidification even during flowering.
❓ Should I place my dehumidifier inside or outside the tent?
Outside is better if possible. Dehumidifiers generate heat, which can raise tent temperature. Place the dehumidifier outside and use ducting to pull humid air from the tent, dehumidify it, and return dry air. This removes moisture without adding heat to the growing environment.
❓ What’s the difference between refrigerant and desiccant dehumidifiers?
Refrigerant dehumidifiers use compressors and cooling coils to condense moisture (like air conditioners). They’re more efficient and have higher capacity but are noisier and less effective in cold conditions. Desiccant dehumidifiers use moisture-absorbing materials and work well in cold conditions but are less efficient and have lower capacity.
❓ How often should I clean my dehumidifier?
Clean filters monthly to maintain airflow. Empty and clean water reservoirs weekly if not using continuous drain. Vacuum cooling coils annually to remove dust buildup. Regular cleaning maintains efficiency and prevents mold and bacteria growth.
❓ Can I automate my entire climate system?
Yes. Smart controllers like AC Infinity Controller 69 or Trolmaster Hydro-X can manage dehumidifiers, humidifiers, heaters, AC units, and fans from a single interface. These controllers maintain target temperature, humidity, or VPD automatically by coordinating multiple devices.
❓ What temperature should I maintain during flowering?
Maintain 70-78°F during lights-on and 60-68°F during lights-off. Slightly cooler temperatures during flowering can enhance terpene production and color development. Ensure 10-15°F differential between day and night temperatures for optimal results.
❓ Do I need different humidity levels for different growth stages?
Yes. Reduce humidity progressively: 60-70% seedling, 55-65% early vegetative, 50-60% late vegetative, 40-50% early-mid flowering, 35-45% late flowering. This progression supports plant development and prevents disease.
📂 References
[1] Chandra, S., Lata, H., Khan, I. A., & ElSohly, M. A. (2011). Temperature response of photosynthesis in different drug and fiber varieties of Cannabis sativa L. Physiology and Molecular Biology of Plants, 17(4), 297-303. https://link.springer.com/article/10.1007/s12298-011-0068-4
[2] Caplan, D., Dixon, M., & Zheng, Y. (2019). Increasing inflorescence dry weight and cannabinoid content in medical cannabis using controlled drought stress. HortScience, 54(5), 964-969. https://journals.ashs.org/hortsci/view/journals/hortsci/54/5/article-p964.xml
[3] Llewellyn, D., Golem, S., Jones, A. M. P., & Zheng, Y. (2023). Foliar symptomology, nutrient content, and cannabinoid concentration of cannabis grown hydroponically with different electrical conductivities. Crop Science, 63(1), 331-349. https://acsess.onlinelibrary.wiley.com/doi/10.1002/csc2.20851
[4] Hawley, D., Graham, T., Stasiak, M., & Dixon, M. (2018). Improving cannabis bud quality and yield with subcanopy lighting. HortScience, 53(11), 1593-1599. https://journals.ashs.org/hortsci/view/journals/hortsci/53/11/article-p1593.xml
[5] Burgel, L., Hartung, J., & Graeff-Hönninger, S. (2020). Impact of different growing substrates on plant growth and cannabinoid concentration of Cannabis sativa L. Agronomy, 10(11), 1734. https://www.mdpi.com/2073-4395/10/11/1734
[6] Danziger, N., & Bernstein, N. (2021). Plant architecture manipulation increases cannabinoid standardization in ‘drug-type’ medical cannabis. Industrial Crops and Products, 167, 113528. https://www.sciencedirect.com/science/article/abs/pii/S0926669021002855
This guide is for educational purposes only. Always check local laws regarding cannabis cultivation before starting to grow.