Table of Contents
📂 Key Takeaways
- Prevention is Everything: A clean growing environment, quarantine procedures for new plants, proper airflow, and regular inspection prevent 90% of pest problems. Prevention is far easier and more effective than treatment.
- Early Detection Saves Crops: Inspect plants daily, paying special attention to leaf undersides where most pests hide. Catching infestations early when populations are small makes control easy. Waiting until infestations are severe makes control difficult or impossible.
- IPM is the Solution: Integrated Pest Management (IPM) combines cultural, physical, biological, and chemical controls in that order. Start with the least invasive methods and escalate only if needed. This approach is more effective and sustainable than relying solely on sprays.
- Correct Identification is Critical: Different pests require different treatments. Misidentification leads to ineffective treatment and wasted time. Learn to identify common pests accurately by their appearance, damage patterns, and behavior.
- Act Quickly: Small infestations become severe infestations rapidly. Most cannabis pests reproduce quickly—spider mites can complete their life cycle in 7-10 days. Treat immediately when pests are detected. Delaying treatment allows populations to explode.
🔍 Introduction: Understanding Cannabis Pests
Pest problems are among the most frustrating challenges in cannabis cultivation. Pests can damage plants, reduce yields, spread diseases, and in severe cases, destroy entire crops. Understanding how to identify, prevent, and control pests is essential for successful cultivation.
Cannabis attracts numerous pests including insects, mites, and other arthropods. These pests feed on plants by sucking sap, chewing tissue, or tunneling through leaves. The damage weakens plants, reduces photosynthesis, and creates entry points for diseases. Additionally, some pests transmit viruses and pathogens that cause further problems.
The key to successful pest management is prevention and early detection. Most pest problems can be prevented through proper sanitation, environmental controls, and regular inspection. When pests do appear, catching them early when populations are small makes control much easier. Waiting until infestations are severe makes control difficult and may require aggressive treatments that stress plants.
This guide covers the seven most common cannabis pests, how to identify them, the damage they cause, and effective treatment methods. You’ll learn integrated pest management (IPM) strategies that combine multiple control methods for maximum effectiveness. By following the prevention and treatment recommendations in this guide, you can protect your plants and maintain healthy, productive crops.
For optimal growing conditions that naturally resist pests, see our guides on Ventilation and Air Circulation, Climate Control, and Complete Beginner’s Guide.
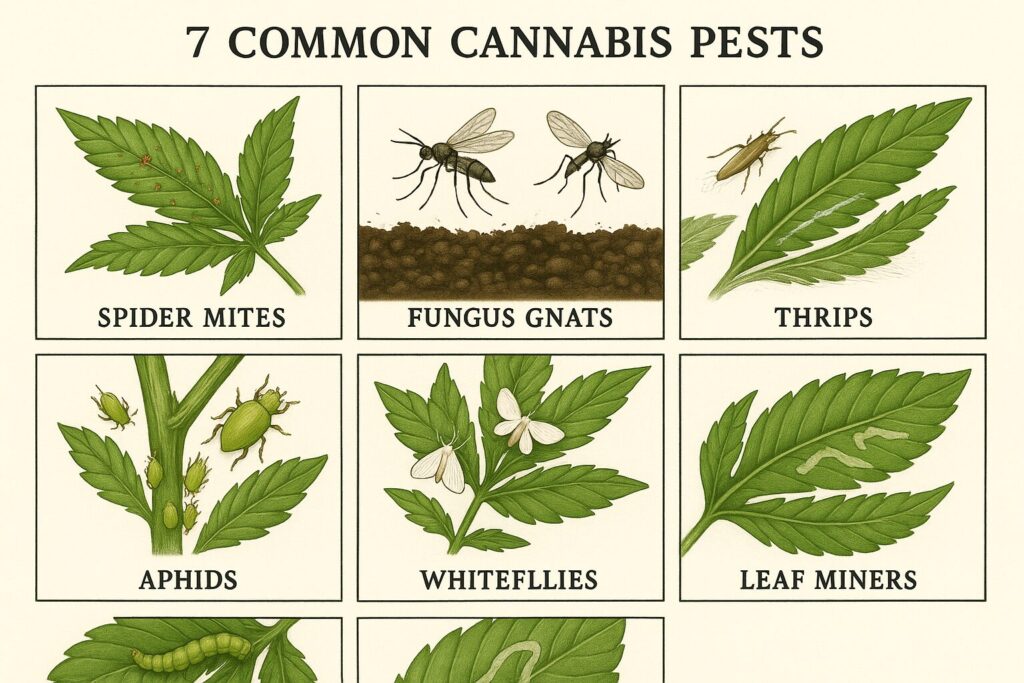
Figure 1: Visual identification guide to seven common cannabis pests
📂 Spider Mites
Spider mites are the most common and destructive pest in cannabis cultivation. These tiny arachnids (not insects) feed by piercing plant cells and sucking out contents, causing extensive damage. Spider mites reproduce rapidly and can destroy crops quickly if not controlled.
Spider Mites: Identification
Spider mites are extremely small—adults are only 0.4-0.5mm long, barely visible to the naked eye. They appear as tiny moving dots on leaf undersides. The most common species is the two-spotted spider mite (Tetranychus urticae), which has two dark spots on its back.
Visual Characteristics:
Adults are oval-shaped and may be red, brown, yellow, or green depending on species and what they’ve been feeding on. They have eight legs (characteristic of arachnids). Eggs are spherical, translucent, and laid on leaf undersides in clusters.
The most distinctive sign of spider mites is fine webbing on plants. As populations grow, mites produce silk webbing that covers leaves, stems, and growing tips. This webbing protects mites from predators and pesticides.
Use a magnifying glass or jeweler’s loupe (10x-30x magnification) to see spider mites clearly. Check leaf undersides, particularly on lower and middle leaves where infestations typically start.
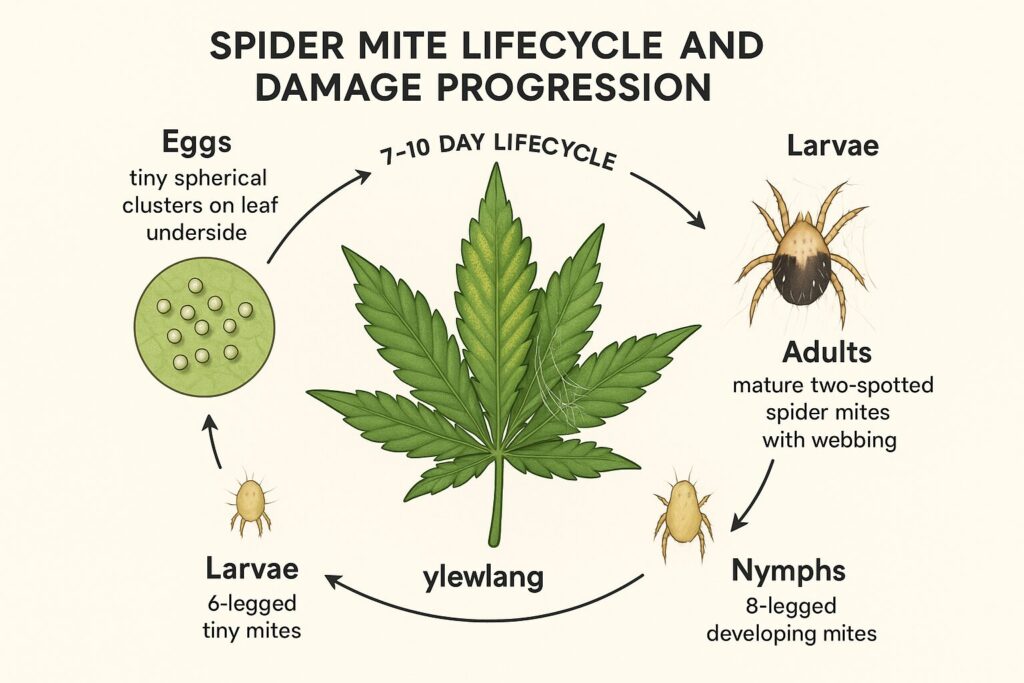
Figure 2: Complete spider mite lifecycle showing eggs, larvae, nymphs, and adults with 7-10 day cycle
Spider Mites: Life Cycle
Spider mites have a rapid life cycle that allows populations to explode quickly. Understanding their life cycle helps target treatments effectively.
Life Cycle Stages:
Eggs (3-5 days): Females lay 100-300 eggs over their lifetime. Eggs are laid on leaf undersides and hatch in 3-5 days depending on temperature.
Larvae (1-2 days): Newly hatched larvae have six legs. They feed briefly before molting.
Nymphs (2-3 days): After molting, nymphs have eight legs. There are two nymph stages (protonymph and deutonymph), each lasting 1-2 days. Nymphs feed actively and grow rapidly.
Adults (7-14 days): Adult females begin laying eggs 1-2 days after final molt. Adults live 7-14 days and feed continuously.
Complete Cycle: Under optimal conditions (warm, dry environment), spider mites complete their life cycle in 7-10 days. This means populations can double every week, leading to exponential growth. A small infestation can become severe in 2-3 weeks.
Temperature affects development speed. Spider mites thrive in warm conditions (70-80°F). Hot temperatures (above 80°F) accelerate development. Cool temperatures (below 60°F) slow development.
Spider Mites: Damage and Symptoms
Spider mite damage is distinctive and progresses through recognizable stages.
Early Stage:
Initial damage appears as tiny yellow or white spots (stippling) on leaf tops. These spots are where mites have pierced cells and sucked out contents. Stippling starts on lower leaves and spreads upward.
Check leaf undersides for tiny moving dots and fine webbing. Early infestations are often localized to a few leaves or one section of the plant.
Mid Stage:
As infestation progresses, stippling becomes more extensive. Leaves develop a speckled or mottled appearance with hundreds of tiny spots. Affected leaves begin to yellow and lose color.
Webbing becomes more visible, particularly on leaf undersides and between leaves and stems. Plants may appear dusty or dirty due to webbing and mite waste.
Late Stage:
Severely infested leaves turn completely yellow, then brown, and die. Leaves become dry and crispy. Heavy webbing covers entire plants, making them appear wrapped in silk.
Plant growth slows or stops. Photosynthesis is severely impaired. Flowering plants produce smaller buds with reduced potency. In extreme cases, plants die from severe infestation.
Secondary Problems:
Spider mite damage creates stress that makes plants susceptible to diseases. Damaged tissue provides entry points for pathogens. Severely weakened plants are more vulnerable to other pests and environmental stress.
Spider Mites: Treatment
Spider mites are challenging to control because they reproduce rapidly, develop resistance to pesticides quickly, and hide on leaf undersides protected by webbing. Effective control requires multiple treatment methods and persistence.
Immediate Actions:
Isolate infested plants immediately to prevent mites from spreading to healthy plants. Spider mites can crawl between touching plants and can be carried on clothing, tools, and hands.
Remove heavily infested leaves and dispose of them in sealed bags. Don’t compost infested material—mites can survive and spread. For severe infestations, consider removing entire plants to protect the rest of your crop.
Environmental Controls:
Spider mites thrive in hot, dry conditions. Increase humidity to 50-60% to slow reproduction. Mites struggle in humid conditions. Lower temperature if possible—cooler conditions slow development.
Improve air circulation with fans. Moving air makes it harder for mites to establish and spread. However, don’t point fans directly at plants as this can spread mites.
Physical Controls:
Spray plants with strong water spray to knock mites off leaves. Focus on leaf undersides. Repeat every 2-3 days. This physically removes mites but doesn’t kill eggs, so repeated applications are necessary.
Wipe leaves with damp cloth to remove mites and webbing. This is labor-intensive but effective for small infestations or valuable plants.
Organic Sprays:
Neem Oil: Effective against all life stages. Mix 2 tablespoons neem oil + 1 teaspoon mild soap per gallon of water. Spray thoroughly, covering all leaf surfaces especially undersides. Repeat every 3-5 days for 2-3 weeks. Neem works slowly by disrupting mite reproduction and feeding.
Insecticidal Soap: Kills mites on contact by breaking down their protective coating. Mix according to label directions. Spray thoroughly, ensuring complete coverage. Repeat every 2-3 days. Soap has no residual effect—it only kills mites it contacts directly.
Horticultural Oil: Suffocates mites and eggs. Mix according to label directions. Spray thoroughly. Repeat every 5-7 days. Don’t use oil in hot conditions (above 85°F) or on stressed plants as it can cause burning.
Pyrethrin: Natural insecticide derived from chrysanthemum flowers. Kills mites on contact. Mix according to label directions. Spray in evening (pyrethrin breaks down in sunlight). Repeat every 3-5 days. Rotate with other treatments to prevent resistance.
Application Tips:
Spray in early morning or evening when temperatures are cool. Never spray under lights or in hot conditions. Ensure complete coverage, especially leaf undersides where mites hide. Spray until solution drips from leaves.
Rotate between different treatments to prevent resistance. Don’t use the same product repeatedly. Combine treatments—for example, spray with water one day, neem oil two days later, insecticidal soap three days after that.
Biological Controls:
Predatory Mites (Phytoseiulus persimilis, Neoseiulus californicus): These beneficial mites feed exclusively on spider mites. They’re highly effective for ongoing control. Release predatory mites at first sign of spider mites. They establish populations and provide long-term control.
P. persimilis is aggressive and effective for heavy infestations but requires high humidity (60%+). N. californicus tolerates drier conditions and is better for prevention and light infestations.
Ladybugs: Adult ladybugs and larvae feed on spider mites. Release 1500-4500 ladybugs per 1000 square feet. Ladybugs are mobile and may leave the area, so they’re better for outdoor or greenhouse growing than indoor grows.
Green Lacewings: Lacewing larvae are voracious predators of spider mites. Release eggs or larvae. Lacewings are effective but less specialized than predatory mites.
Chemical Controls (Last Resort):
For severe infestations that don’t respond to organic treatments, miticides may be necessary. Use only products labeled for spider mites and safe for cannabis. Follow label directions exactly.
Abamectin (Avid): Systemic miticide effective against all stages. Apply as directed. Don’t use during flowering—observe pre-harvest intervals.
Never use chemical controls during flowering. Residues can contaminate buds. If infestation occurs during flowering, use only water sprays, physical removal, or beneficial insects.
Prevention:
Maintain humidity 50-60% and temperature below 75°F. Inspect plants daily, checking leaf undersides. Quarantine new plants for 2 weeks before introducing to grow room. Keep grow area clean. Use preventive releases of predatory mites.
📂 Fungus Gnats
Fungus gnats are small flying insects commonly found around cannabis plants. While adults are mostly harmless, larvae feed on roots and can damage young plants. Fungus gnats thrive in moist growing conditions and are particularly problematic in soil and soilless media.
Fungus Gnats: Identification
Adult fungus gnats are small (2-3mm long), delicate flies that resemble tiny mosquitoes. They’re dark gray or black with long legs and antennae. Adults fly weakly and are often seen walking on soil surface or flying near plants when disturbed.
Visual Characteristics:
Adults have clear or smoky wings held over their backs when at rest. They’re attracted to light and moisture. Large numbers of adults flying around plants indicate infestation.
Larvae are translucent white maggots with black heads, 4-5mm long when mature. They live in growing medium and feed on organic matter, fungi, and plant roots. Larvae are most visible when medium is disturbed or when they crawl on medium surface.
Detection:
Place yellow sticky traps near soil surface. Adult fungus gnats are strongly attracted to yellow and will stick to traps. This helps monitor population levels and confirm identification.
Check soil surface for tiny white larvae. Water plants and watch for larvae floating to surface or crawling on soil.
Fungus Gnats: Life Cycle
Fungus gnats have a rapid life cycle, particularly in warm, moist conditions.
Life Cycle Stages:
Eggs (2-3 days): Females lay 100-300 eggs in moist growing medium. Eggs are tiny, oval, and translucent. They hatch in 2-3 days.
Larvae (10-14 days): Larvae go through four instars (growth stages) over 10-14 days. First instar larvae feed on organic matter and fungi in medium. Later instars may feed on plant roots, particularly fine root hairs.
Pupae (3-4 days): Mature larvae pupate in growing medium near surface. Pupae are small, brown, and inactive. Adults emerge after 3-4 days.
Adults (7-10 days): Adults live 7-10 days. Females begin laying eggs within 24 hours of emergence. Adults don’t feed on plants but feed on nectar and moisture.
Complete Cycle: Total life cycle is 18-30 days depending on temperature. Populations can build quickly in optimal conditions (warm, moist medium with organic matter).
Fungus Gnats: Damage and Symptoms
Adult fungus gnats cause minimal direct damage but are annoying and indicate larval infestation. Larvae cause the real damage.
Larval Damage:
Larvae feed on fine root hairs and young roots, reducing plants’ ability to absorb water and nutrients. Damage is most severe on young plants, seedlings, and clones with developing root systems.
Symptoms include slow growth, wilting despite adequate watering, yellowing leaves (from reduced nutrient uptake), and general decline in plant health. Severely damaged plants may die.
Root damage creates entry points for root rot pathogens (Pythium, Fusarium). Fungus gnat larvae can spread these diseases as they move through medium.
Indirect Damage:
Large populations of adults are annoying and can spread diseases. Adults walking on plants can transmit pathogens from infected to healthy plants.
In flowering, adults may get stuck in resinous buds, contaminating the final product.
Fungus Gnats: Treatment
Fungus gnats are relatively easy to control by targeting both adults and larvae.
Cultural Controls:
Allow growing medium to dry between waterings. Fungus gnats require moist conditions to reproduce. Letting the top 1-2 inches of medium dry kills eggs and young larvae.
Avoid overwatering. Constantly wet medium creates ideal conditions for fungus gnats. Water only when medium is dry 1-2 inches below surface.
Remove standing water from trays and saucers. Don’t let pots sit in water.
Physical Controls:
Yellow Sticky Traps: Place traps horizontally just above soil surface or vertically near plants. Traps catch adults, reducing reproduction. Replace traps when covered with gnats.
Sand or Diatomaceous Earth Top Dressing: Apply 1/2 inch layer of sand or diatomaceous earth on soil surface. This creates a dry barrier that larvae can’t penetrate. Adults can’t lay eggs in dry material.
Potato Slices: Place potato slices on soil surface. Larvae are attracted to potatoes. After 24 hours, remove and dispose of slices with larvae. Repeat every few days. This monitors and reduces larval populations.
Biological Controls:
Beneficial Nematodes (Steinernema feltiae): Microscopic worms that parasitize fungus gnat larvae. Mix nematodes with water according to package directions and apply to growing medium. Nematodes seek out and kill larvae. Highly effective and safe.
Apply nematodes when medium is moist. Keep medium moist for 7-10 days after application to allow nematodes to establish. Repeat applications every 2-3 weeks if needed.
Predatory Mites (Hypoaspis miles): These soil-dwelling mites feed on fungus gnat larvae and eggs. Apply to medium surface. Mites establish populations and provide long-term control.
Bacillus thuringiensis israelensis (Bti): Bacterial insecticide that specifically targets fungus gnat larvae. Mix Bti (sold as Mosquito Bits, Gnatrol) with water and apply to medium. Bti produces toxins that kill larvae when ingested. Safe for plants and beneficial organisms.
Apply Bti every 5-7 days for 2-3 weeks to break the life cycle. Bti has no residual effect, so repeated applications are necessary.
Rove Beetles (Dalotia coriaria): Predatory beetles that feed on fungus gnat larvae and pupae. Introduce beetles to growing area. They establish populations and provide ongoing control.
Chemical Controls:
For severe infestations, insecticides may be necessary. Use products labeled for fungus gnats and safe for cannabis.
Pyrethrin: Spray adults to reduce reproduction. Mix according to label directions. Spray in evening. Repeat every 3-5 days.
Azadirachtin (Neem Extract): Drench growing medium with azadirachtin solution to kill larvae. Mix according to label directions. Repeat every 5-7 days.
Prevention:
Don’t overwater. Allow medium to dry between waterings. Use well-draining growing medium. Cover medium surface with sand or perlite. Quarantine new plants. Use yellow sticky traps for early detection. Apply beneficial nematodes preventively.
📂 Thrips
Thrips are small, slender insects that feed on cannabis by rasping leaf surfaces and sucking plant juices. They cause distinctive silvery damage and can transmit plant viruses. Thrips are challenging to control because they’re mobile, hide in flowers and growing tips, and reproduce quickly.
Thrips: Identification
Thrips are tiny (1-2mm long), elongated insects with fringed wings. They’re difficult to see without magnification. Adults may be yellow, brown, or black depending on species. The most common species on cannabis are western flower thrips (Frankliniella occidentalis) and onion thrips (Thrips tabaci).
Visual Characteristics:
Adults have narrow bodies and two pairs of feathery wings held flat over their backs. They’re fast-moving and fly short distances when disturbed. Thrips often hide in flowers, growing tips, and leaf folds.
Nymphs are smaller than adults (0.5-1mm), wingless, and pale yellow or white. They’re found on leaf undersides and in flowers.
Detection:
Shake flowers or leaves over white paper. Thrips will fall onto paper and appear as tiny moving specks. Use magnifying glass to confirm identification.
Check for silvery streaks on leaves (feeding damage) and tiny black dots (fecal matter called frass). These signs indicate thrips presence even if insects aren’t visible.
Blue or yellow sticky traps attract and catch thrips, helping monitor populations.
Thrips: Life Cycle
Thrips have a complex life cycle with both feeding and non-feeding stages.
Life Cycle Stages:
Eggs (2-3 days): Females insert eggs into plant tissue (leaves, stems, flowers). Eggs are kidney-shaped, translucent, and invisible without magnification. They hatch in 2-3 days.
Larvae/Nymphs (5-7 days): There are two feeding larval stages (instars). Larvae are pale yellow and feed actively on leaves and flowers. After second instar, larvae drop to soil or medium.
Pupae (2-4 days): Larvae pupate in soil or medium. There are two pupal stages (prepupa and pupa), both non-feeding. Pupae are inactive and difficult to kill with contact insecticides.
Adults (14-30 days): Adults emerge and fly to plants. Females begin laying eggs within 1-2 days. Adults feed and reproduce continuously.
Complete Cycle: Total life cycle is 10-20 days depending on temperature. Thrips thrive in warm conditions (70-85°F). Multiple generations overlap, so all life stages are present simultaneously.
Thrips: Damage and Symptoms
Thrips damage is distinctive and easy to recognize once you know what to look for.
Feeding Damage:
Thrips feed by rasping leaf surfaces with their mouthparts and sucking released plant juices. This creates distinctive silvery or bronze streaks and patches on leaves. Damaged areas appear shiny or reflective.
Heavily fed leaves develop a silvery-white appearance and may curl or distort. Leaf tips and edges may turn brown and die.
Frass:
Thrips leave tiny black dots (fecal matter) on leaves. These dots are visible with the naked eye and help confirm thrips presence. Frass is often found along silvery feeding trails.
Scarring:
Feeding on young leaves causes permanent scarring. As leaves expand, damaged areas become distorted, creating twisted or deformed growth.
Flower Damage:
Thrips feed on flowers, causing browning, distortion, and reduced quality. In cannabis, thrips feeding on buds creates brown spots and can introduce mold.
Virus Transmission:
Some thrips species transmit plant viruses including tobacco mosaic virus and impatiens necrotic spot virus. Virus symptoms include mottled leaves, stunted growth, and plant death.

Figure 3: Comparison of damage symptoms from spider mites, thrips, aphids, and leaf miners
Thrips: Treatment
Thrips are challenging to control because they hide in flowers and growing tips, pupate in soil (protected from sprays), and develop resistance to insecticides quickly. Effective control requires multiple methods.
Cultural Controls:
Remove and destroy heavily infested leaves and flowers. Thrips hide in flowers, so removing infested flowers reduces populations.
Keep grow area clean. Remove plant debris, fallen leaves, and weeds that can harbor thrips.
Physical Controls:
Sticky Traps: Hang blue or yellow sticky traps throughout grow area. Thrips are attracted to these colors. Traps catch adults, reducing reproduction. Place traps at plant height and just above canopy.
Reflective Mulch: Use reflective mulch or aluminum foil around plants. Reflected light confuses and repels thrips.
Screening: Use fine mesh screening (insect screening) over vents and openings to prevent thrips from entering grow area.
Organic Sprays:
Spinosad: Organic insecticide derived from soil bacteria. Highly effective against thrips. Mix according to label directions. Spray thoroughly, covering all plant surfaces. Spinosad works by ingestion, so thrips must feed on treated surfaces. Repeat every 5-7 days for 2-3 weeks.
Neem Oil: Disrupts thrips reproduction and feeding. Mix 2 tablespoons neem oil + 1 teaspoon mild soap per gallon water. Spray thoroughly every 5-7 days.
Insecticidal Soap: Kills thrips on contact. Mix according to label directions. Spray thoroughly, ensuring complete coverage. Repeat every 2-3 days. Soap only kills thrips it contacts directly.
Pyrethrin: Natural insecticide that kills thrips on contact. Mix according to label directions. Spray in evening. Repeat every 3-5 days.
Application Tips:
Spray early morning or evening. Ensure complete coverage, especially flowers and growing tips where thrips hide. Spray until solution drips from plants.
Rotate between different treatments to prevent resistance. Thrips develop resistance quickly, so don’t rely on single products.
Biological Controls:
Predatory Mites (Neoseiulus cucumeris, Amblyseius swirskii): These mites feed on thrips larvae. Release preventively or at first sign of thrips. Mites establish populations and provide ongoing control.
Minute Pirate Bugs (Orius insidiosus): Small predatory bugs that feed on thrips at all life stages. Very effective. Release 1-2 bugs per plant. Bugs establish populations in flowers where thrips hide.
Green Lacewings: Lacewing larvae feed on thrips. Release eggs or larvae. Lacewings are generalist predators effective against multiple pests.
Predatory Thrips (Franklinothrips vespiformis): Beneficial thrips that prey on pest thrips. Release in grow area. They establish populations and provide long-term control.
Beneficial Nematodes (Steinernema feltiae): Attack thrips pupae in soil. Apply nematodes to growing medium. Effective for breaking life cycle by killing pupal stage.
Chemical Controls (Last Resort):
For severe infestations, systemic insecticides may be necessary. Use only products labeled for thrips and safe for cannabis. Never use during flowering.
Prevention:
Screen vents and openings. Use sticky traps for early detection. Inspect new plants carefully before introducing to grow area. Maintain good air circulation. Release beneficial insects preventively.
📂 Aphids
Aphids are soft-bodied insects that feed by sucking plant sap. They reproduce rapidly and can build large populations quickly. Aphids excrete honeydew (sticky substance) that attracts ants and promotes sooty mold growth.
Aphids: Identification
Aphids are small (1-3mm long), pear-shaped insects with long antennae and two tubes (cornicles) projecting from their rear. They may be green, yellow, black, brown, red, or white depending on species.
Visual Characteristics:
Adults may be winged or wingless. Wingless forms are more common and cluster on stems, leaf undersides, and growing tips. Winged forms appear when populations are high and disperse to new plants.
Aphids are often found in dense clusters. They remain stationary while feeding, creating visible colonies on plants.
Nymphs resemble adults but are smaller. Multiple generations overlap, so all sizes are present simultaneously.
Detection:
Check stems, leaf undersides, and growing tips for clusters of small insects. Aphids don’t hide—they feed openly in visible locations.
Look for sticky honeydew on leaves and stems. Honeydew is a sugary excretion that makes plants feel sticky. Ants farming aphids for honeydew indicate aphid presence.
Check for sooty mold (black fungus) growing on honeydew. This black coating on leaves indicates aphid infestation even if aphids aren’t visible.
Aphids: Life Cycle
Aphids have a unique reproductive strategy that allows rapid population growth.
Reproduction:
Most aphids reproduce asexually through parthenogenesis—females give birth to live female nymphs without mating. This allows extremely rapid population growth.
Females produce 5-10 nymphs per day for 20-30 days. Nymphs mature in 7-10 days and begin reproducing. This means populations can double every few days.
When populations are high or conditions deteriorate, aphids produce winged forms that fly to new plants and establish new colonies.
Life Cycle:
Nymphs (7-10 days): Born live, nymphs go through 4-5 molts over 7-10 days. They feed continuously and grow rapidly.
Adults (20-30 days): Adults feed and reproduce continuously. Wingless adults remain on host plants. Winged adults disperse to new plants.
Complete Cycle: Generation time is 7-10 days. Under optimal conditions (warm temperatures, succulent plant growth), populations explode rapidly.
Aphids: Damage and Symptoms
Aphids cause multiple types of damage through feeding, honeydew production, and virus transmission.
Feeding Damage:
Aphids suck plant sap, removing nutrients and water. Heavy infestations cause leaves to yellow, curl, and distort. Growing tips may be stunted or deformed.
Plants appear weak and growth slows. Flowering is reduced and buds are smaller.
Honeydew:
Aphids excrete honeydew, a sticky, sugary substance. Honeydew coats leaves and stems, making plants sticky. It attracts ants, which protect aphids from predators.
Honeydew promotes growth of sooty mold, a black fungus that covers leaves. Sooty mold blocks light and reduces photosynthesis. While it doesn’t directly harm plants, it’s unsightly and indicates aphid problems.
Virus Transmission:
Aphids transmit numerous plant viruses including cucumber mosaic virus and tobacco mosaic virus. Virus symptoms include mottled leaves, stunted growth, and reduced yields. There’s no cure for plant viruses—infected plants must be removed.
Secondary Problems:
Aphid feeding and honeydew create conditions favorable for other pests and diseases. Weakened plants are more susceptible to stress and other problems.
Aphids: Treatment
Aphids are relatively easy to control because they’re soft-bodied, reproduce slowly compared to mites, and are susceptible to many treatments.
Physical Controls:
Spray plants with strong water spray to knock aphids off. Focus on stems, leaf undersides, and growing tips. Repeat every 2-3 days. Most dislodged aphids won’t return to plants.
Wipe aphids off with damp cloth or gloved hand. This is effective for small infestations or localized colonies.
Remove heavily infested leaves and growing tips. Dispose in sealed bags.
Organic Sprays:
Insecticidal Soap: Very effective against aphids. Mix according to label directions. Spray thoroughly, covering all plant surfaces especially where aphids cluster. Repeat every 2-3 days until aphids are gone.
Neem Oil: Kills aphids and disrupts reproduction. Mix 2 tablespoons neem oil + 1 teaspoon mild soap per gallon water. Spray thoroughly every 5-7 days.
Pyrethrin: Kills aphids on contact. Mix according to label directions. Spray in evening. Repeat every 3-5 days.
Horticultural Oil: Suffocates aphids. Mix according to label directions. Spray thoroughly. Don’t use in hot conditions (above 85°F).
Homemade Soap Spray: Mix 2 tablespoons mild liquid soap (not detergent) per gallon water. Spray aphids directly. Repeat every 2-3 days. Rinse plants with plain water 2-3 hours after application to prevent leaf damage.
Biological Controls:
Ladybugs: Adult ladybugs and larvae are voracious aphid predators. One ladybug can eat 50-60 aphids per day. Release 1500-4500 ladybugs per 1000 square feet. Ladybugs are highly effective for aphid control.
Mist plants before releasing ladybugs. Release in evening. Ladybugs are mobile and may leave, but they’ll stay if aphids are present.
Green Lacewings: Lacewing larvae feed on aphids. One larva can eat 200+ aphids during development. Release eggs or larvae. Lacewings establish populations and provide ongoing control.
Parasitic Wasps (Aphidius spp.): Tiny wasps that lay eggs inside aphids. Larvae develop inside aphids, killing them. Parasitized aphids become tan or brown “mummies.” Release wasps preventively or at first sign of aphids.
Hoverfly Larvae: Larvae of hoverflies (flower flies) feed on aphids. Adults are attracted to flowers. Plant flowers near cannabis to attract hoverflies naturally.
Cultural Controls:
Avoid over-fertilizing with nitrogen. Excessive nitrogen creates succulent growth that attracts aphids. Use balanced fertilization.
Control ants. Ants protect aphids from predators in exchange for honeydew. Eliminating ants allows beneficial insects to control aphids naturally.
Remove weeds and plant debris that can harbor aphids.
Chemical Controls (Last Resort):
For severe infestations, systemic insecticides may be necessary. Use only products labeled for aphids and safe for cannabis. Never use during flowering.
Prevention:
Inspect plants regularly, especially new growth. Quarantine new plants. Use sticky traps for early detection. Encourage beneficial insects. Avoid excessive nitrogen fertilization.
📂 Whiteflies
Whiteflies are small, white, moth-like insects that feed by sucking plant sap. They’re challenging to control because they fly readily when disturbed, reproduce quickly, and develop resistance to insecticides. Whiteflies excrete honeydew and can transmit plant viruses.
Whiteflies: Identification
Adult whiteflies are tiny (1-2mm long) with white, powdery wings held tent-like over their bodies. They resemble tiny moths. When plants are disturbed, whiteflies fly up in clouds before settling back on plants.
Visual Characteristics:
Adults have four wings covered with white, waxy powder. They’re weak fliers but disperse readily when disturbed.
Nymphs (scales) are flat, oval, translucent or pale green, and found on leaf undersides. They’re immobile and resemble scale insects. Nymphs have a distinctive fringe of waxy filaments around their edges.
Eggs are tiny, cone-shaped, and attached to leaf undersides by short stalks. They’re pale yellow initially, turning gray before hatching.
Detection:
Shake plants gently. Whiteflies fly up in distinctive white clouds. This is the most obvious sign of infestation.
Check leaf undersides for nymphs (scales) and eggs. Use magnifying glass to see details.
Look for honeydew and sooty mold on lower leaves. Whiteflies on upper leaves drip honeydew onto lower leaves.
Yellow sticky traps catch adults and help monitor populations.
Whiteflies: Life Cycle
Whiteflies have a complex life cycle with mobile adult stage and immobile nymphal stages.
Life Cycle Stages:
Eggs (5-7 days): Females lay 200-400 eggs on leaf undersides. Eggs hatch in 5-7 days.
Crawlers (1 day): First instar nymphs (crawlers) are mobile for several hours, moving short distances on leaf before settling. Once settled, they insert mouthparts and become immobile.
Nymphs (14-21 days): Nymphs go through four instars over 14-21 days. They remain immobile, feeding continuously. Fourth instar (puparium) is thicker and more visible than earlier instars.
Adults (14-30 days): Adults emerge and fly to new leaves. Females begin laying eggs within 1-2 days. Adults feed and reproduce continuously.
Complete Cycle: Total life cycle is 21-35 days depending on temperature. Whiteflies thrive in warm conditions (70-80°F). Multiple generations overlap.
Whiteflies: Damage and Symptoms
Whiteflies cause damage through feeding, honeydew production, and virus transmission.
Feeding Damage:
Whiteflies suck plant sap, removing nutrients and water. Heavy infestations cause leaves to yellow, wilt, and drop. Plants appear weak and growth slows.
Nymphs cause more feeding damage than adults because they feed continuously in one location.
Honeydew:
Whiteflies excrete large amounts of honeydew. Honeydew coats lower leaves, making them sticky and shiny. It promotes sooty mold growth, which blocks light and reduces photosynthesis.
Virus Transmission:
Whiteflies transmit numerous plant viruses. Symptoms include mottled leaves, stunted growth, and plant death. There’s no cure for plant viruses.
Stress:
Heavy whitefly infestations stress plants, making them susceptible to other pests and diseases. Weakened plants are more vulnerable to environmental stress.
Whiteflies: Treatment
Whiteflies are challenging to control because adults fly readily and disperse, nymphs are protected on leaf undersides, and they develop resistance to insecticides quickly.
Physical Controls:
Vacuum: Use handheld vacuum to suck up adult whiteflies. Gently shake plants to make whiteflies fly, then vacuum them. Empty vacuum immediately into sealed bag and dispose. Repeat daily. This reduces adult populations and reproduction.
Yellow Sticky Traps: Hang traps throughout grow area. Whiteflies are strongly attracted to yellow. Traps catch adults, reducing reproduction. Place traps at plant height and just above canopy. Replace when covered with whiteflies.
Water Spray: Spray leaf undersides with strong water spray to dislodge nymphs. Repeat every 2-3 days. This is less effective than for aphids because nymphs attach firmly to leaves.
Cultural Controls:
Remove heavily infested leaves. Dispose in sealed bags. This reduces nymph populations.
Keep grow area clean. Remove plant debris and weeds.
Avoid over-fertilizing with nitrogen. Excessive nitrogen creates succulent growth that attracts whiteflies.
Organic Sprays:
Insecticidal Soap: Effective against nymphs and adults. Mix according to label directions. Spray thoroughly, covering all leaf surfaces especially undersides. Repeat every 2-3 days for 2-3 weeks to break life cycle.
Neem Oil: Kills nymphs and disrupts adult reproduction. Mix 2 tablespoons neem oil + 1 teaspoon mild soap per gallon water. Spray thoroughly every 5-7 days.
Horticultural Oil: Suffocates nymphs and eggs. Mix according to label directions. Spray thoroughly, covering leaf undersides. Don’t use in hot conditions (above 85°F).
Pyrethrin: Kills adults on contact. Mix according to label directions. Spray in evening. Repeat every 3-5 days.
Application Tips:
Focus on leaf undersides where nymphs feed. Spray until solution drips from leaves. Rotate between different treatments to prevent resistance.
Biological Controls:
Parasitic Wasps (Encarsia formosa): Tiny wasps that parasitize whitefly nymphs. Wasps lay eggs inside nymphs. Larvae develop inside nymphs, killing them. Parasitized nymphs turn black. Release wasps preventively or at first sign of whiteflies. Very effective for ongoing control.
Predatory Beetles (Delphastus catalinae): Small beetles that feed on whitefly eggs and nymphs. Release beetles in grow area. They establish populations and provide long-term control.
Green Lacewings: Lacewing larvae feed on whitefly nymphs and eggs. Release eggs or larvae.
Ladybugs: Feed on whitefly nymphs and eggs. Less effective than for aphids but still beneficial.
Chemical Controls (Last Resort):
For severe infestations, systemic insecticides may be necessary. Use only products labeled for whiteflies and safe for cannabis. Never use during flowering.
Prevention:
Screen vents and openings. Use sticky traps for early detection. Inspect new plants carefully. Quarantine new plants for 2 weeks. Release beneficial insects preventively.
📂 Caterpillars and Worms
Caterpillars are larvae of moths and butterflies. Several species feed on cannabis including budworms (corn earworms), cabbage loopers, and armyworms. Caterpillars cause extensive damage by chewing leaves and boring into buds. They’re particularly problematic for outdoor growers.
Caterpillars: Identification
Caterpillars are soft-bodied larvae with distinct head capsule and multiple body segments. They have three pairs of true legs near the head and several pairs of fleshy prolegs on the abdomen.
Common Species:
Budworms (Corn Earworms): Green, brown, or pink caterpillars up to 40mm long. They bore into buds and feed inside, causing extensive damage. Very destructive during flowering.
Cabbage Loopers: Green caterpillars up to 40mm long that move in distinctive looping motion. They have white stripes along their sides. Feed on leaves and buds.
Armyworms: Green, brown, or black caterpillars up to 40mm long with stripes along their bodies. Feed voraciously on leaves.
Detection:
Look for chewed leaves with large, irregular holes. Caterpillars eat leaf tissue between veins, creating a ragged appearance.
Check for frass (caterpillar droppings) on leaves and buds. Frass looks like small, dark pellets.
Inspect buds for entry holes and webbing. Budworms bore into buds and feed inside, leaving frass and damaged tissue.
Look for caterpillars on plants, especially on leaf undersides and inside buds. Many caterpillars are well-camouflaged and difficult to see.
Caterpillars: Damage and Symptoms
Caterpillars cause extensive damage by chewing plant tissue.
Leaf Damage:
Caterpillars chew large, irregular holes in leaves. Heavy infestations can defoliate plants. Young caterpillars eat small holes. Mature caterpillars consume entire leaves.
Bud Damage:
Budworms bore into flowers and feed inside. This causes extensive internal damage that’s not visible from outside. Damaged buds develop mold (botrytis) from moisture and frass inside buds.
Bud damage is particularly serious because it ruins the final product. Moldy buds must be discarded.
Frass:
Caterpillar droppings (frass) accumulate on leaves and inside buds. Frass promotes mold growth and contaminates buds.
Caterpillars: Treatment
Caterpillars are relatively easy to control with proper methods.
Physical Controls:
Hand Picking: Inspect plants daily and remove caterpillars by hand. This is the most effective method for small infestations or small grows. Drop caterpillars into soapy water to kill them.
Check leaf undersides, stems, and inside buds. Many caterpillars are well-camouflaged, so look carefully.
Remove damaged leaves and buds. Dispose in sealed bags.
Barriers:
Cover outdoor plants with fine mesh netting to prevent moths from laying eggs. Ensure netting doesn’t touch plants (caterpillars can feed through netting).
Biological Controls:
Bacillus thuringiensis (Bt): Bacterial insecticide that specifically targets caterpillars. Bt produces toxins that kill caterpillars when ingested. Safe for plants, beneficial insects, and humans.
Mix Bt (sold as Dipel, Thuricide) according to label directions. Spray thoroughly, covering all plant surfaces. Caterpillars must eat treated foliage to be affected. Repeat every 5-7 days while caterpillars are present.
Bt breaks down quickly in sunlight, so spray in evening for best results. Bt is most effective against young caterpillars—older caterpillars are more resistant.
Parasitic Wasps (Trichogramma spp.): Tiny wasps that parasitize caterpillar eggs. Release wasps preventively during moth flight season. Wasps lay eggs inside caterpillar eggs, preventing hatching.
Predatory Insects: Birds, wasps, and predatory beetles feed on caterpillars. Encourage these natural predators by providing habitat.
Organic Sprays:
Spinosad: Organic insecticide effective against caterpillars. Mix according to label directions. Spray thoroughly. Repeat every 7-10 days.
Neem Oil: Disrupts caterpillar feeding and development. Mix 2 tablespoons neem oil + 1 teaspoon mild soap per gallon water. Spray thoroughly every 5-7 days.
Pyrethrin: Kills caterpillars on contact. Mix according to label directions. Spray in evening. Repeat every 5-7 days.
Prevention:
Inspect plants daily, especially during flowering. Use netting barriers for outdoor grows. Release parasitic wasps preventively. Apply Bt preventively during moth flight season. Remove plant debris and weeds that harbor moth pupae.
📂 Leaf Miners
Leaf miners are larvae of small flies, moths, or beetles that tunnel between upper and lower leaf surfaces, feeding on internal leaf tissue. The distinctive winding trails they create are diagnostic.
Leaf Miners: Identification
Leaf miners themselves are rarely seen—they live inside leaves. Adult flies are tiny (2-3mm long), black or yellow. Adults don’t damage plants.
Damage Identification:
Leaf miners create distinctive winding, serpentine trails (mines) in leaves. Trails are white, tan, or brown and widen as larvae grow. Trails may be linear, blotch-shaped, or irregular.
Mines are visible from both sides of leaves. Hold leaves up to light to see larvae inside mines.
Fresh mines appear white or light green. Old mines turn brown as tissue dies.
Detection:
Look for winding trails in leaves. This is the most obvious sign of leaf miners.
Check for tiny puncture marks on leaves where adult flies have fed or laid eggs.
Use sticky traps to catch adult flies and monitor populations.
Leaf Miners: Damage and Symptoms
Leaf miner damage is mostly cosmetic but can affect plant health in heavy infestations.
Feeding Damage:
Larvae feed on internal leaf tissue, creating mines. Mined tissue can’t photosynthesize. Heavy infestations reduce photosynthesis and plant vigor.
Damaged leaves may yellow and drop prematurely.
Secondary Problems:
Mines create entry points for diseases. Damaged tissue is susceptible to fungal and bacterial infections.
Leaf Miners: Treatment
Leaf miners are challenging to control because larvae are protected inside leaves. Most contact insecticides don’t reach them.
Physical Controls:
Remove and destroy infested leaves. This is the most effective control for small infestations. Dispose leaves in sealed bags.
Squash larvae inside mines by pressing leaves between fingers. This kills larvae without removing leaves.
Biological Controls:
Parasitic Wasps (Diglyphus isaea, Dacnusa sibirica): Tiny wasps that parasitize leaf miner larvae inside mines. Release wasps preventively or at first sign of leaf miners. Very effective for ongoing control.
Predatory Mites: Some predatory mites feed on leaf miner eggs on leaf surfaces.
Beneficial Nematodes: Attack leaf miner pupae in soil. Apply nematodes to growing medium.
Organic Sprays:
Neem Oil: Systemic properties allow neem to affect larvae inside leaves. Mix 2 tablespoons neem oil + 1 teaspoon mild soap per gallon water. Spray thoroughly every 5-7 days. Neem works slowly by disrupting larval development.
Spinosad: Effective against leaf miners. Mix according to label directions. Spray thoroughly. Repeat every 7-10 days.
Azadirachtin (Neem Extract): Systemic insecticide that affects larvae inside leaves. Mix according to label directions. Spray or drench. Repeat every 7-10 days.
Chemical Controls (Last Resort):
For severe infestations, systemic insecticides may be necessary. Use only products labeled for leaf miners and safe for cannabis. Never use during flowering.
Prevention:
Use yellow sticky traps to catch adult flies before they lay eggs. Remove plant debris and weeds. Screen vents and openings. Release parasitic wasps preventively.
📋 Prevention Methods
Prevention is the most effective pest management strategy. Preventing pest problems is far easier than treating infestations. Following these prevention methods will eliminate most pest problems before they start.
Sanitation and Hygiene
Clean growing environment is the foundation of pest prevention.
Grow Room Cleanliness:
Keep grow area clean and free of debris. Sweep floors regularly. Remove fallen leaves, dead plant material, and spilled soil immediately. These materials harbor pests and diseases.
Clean and disinfect grow room between crops. Remove all plants and materials. Wash walls, floors, and equipment with bleach solution (1 part bleach to 10 parts water) or hydrogen peroxide solution. This kills pest eggs and disease spores.
Don’t bring outdoor plants into grow room. Outdoor plants often carry pests that spread to indoor plants.
Equipment Hygiene:
Clean and disinfect tools, pots, and equipment between uses. Pests and diseases spread on contaminated tools.
Wash hands before handling plants. Don’t touch plants after being outdoors or handling other plants.
Change clothes before entering grow room if you’ve been in gardens or outdoor areas. Pests can hitchhike on clothing.
Waste Management:
Remove infested plant material immediately. Dispose in sealed bags and remove from property. Don’t compost infested material—many pests survive composting.
Empty and clean drip trays and saucers regularly. Standing water attracts fungus gnats.
Quarantine Procedures
New plants are the most common source of pest introductions. Quarantine prevents infested plants from contaminating your grow.
Quarantine Protocol:
Isolate all new plants (clones, seedlings, mother plants) in separate area for 2-3 weeks before introducing to grow room. This allows time for pest problems to become visible.
Inspect quarantined plants daily. Check for pests, eggs, and damage. Use magnifying glass to examine leaf undersides and stems.
Treat quarantined plants preventively with neem oil or insecticidal soap. This kills pests that might not be visible yet.
Don’t skip quarantine even for plants from trusted sources. Even reputable nurseries occasionally have pest problems.
Inspection:
Examine new plants thoroughly before purchase. Check leaf undersides, stems, and soil surface for pests and eggs.
Avoid plants with any signs of pests or damage. Don’t assume you can treat problems—prevention is easier.
Environmental Controls
Proper environmental conditions make plants less attractive to pests and slow pest reproduction.
Temperature:
Maintain temperature 70-75°F during vegetative growth, 65-70°F during flowering. Many pests thrive in hot conditions. Cooler temperatures slow pest reproduction.
Avoid temperature extremes. Stressed plants are more susceptible to pests.
Humidity:
Maintain humidity 50-60% during vegetative growth, 40-50% during flowering. Spider mites thrive in low humidity. Increasing humidity slows mite reproduction.
However, excessive humidity (above 60%) promotes mold and fungal diseases. Balance humidity for pest control without creating disease problems.
Air Circulation:
Use oscillating fans to maintain constant air movement. Moving air makes it difficult for pests to establish and spread.
Ensure adequate ventilation. Fresh air exchange dilutes pest populations and removes pest-attracting odors.
Don’t point fans directly at plants as this can spread pests and stress plants. Aim for gentle, indirect airflow throughout grow area.
Light:
Some pests are attracted to certain light wavelengths. UV light can repel some pests. However, light management for pest control is secondary to proper intensity and spectrum for plant growth.
Regular Inspection
Early detection is critical for pest control. Regular inspection catches problems when they’re small and easy to control.
Inspection Schedule:
Inspect plants daily. This takes only a few minutes but catches problems early.
Use magnifying glass or jeweler’s loupe (10x-30x magnification) to see tiny pests and eggs.
What to Check:
Leaf Undersides: Most pests hide on leaf undersides. Check lower, middle, and upper leaves. Look for insects, eggs, webbing, and damage.
Stems and Petioles: Check for aphids, scale insects, and other stem-feeding pests.
Growing Tips: Check new growth for aphids, thrips, and distortion.
Soil Surface: Check for fungus gnats, their larvae, and other soil-dwelling pests.
Flowers: During flowering, inspect buds for caterpillars, mold, and other problems.
Signs to Look For:
- Insects (even single insects indicate potential problems)
- Eggs (tiny dots on leaf undersides)
- Webbing (spider mites)
- Honeydew (sticky residue from aphids or whiteflies)
- Frass (insect droppings)
- Damage (holes, stippling, trails, distortion)
- Discoloration (yellowing, silvering, browning)
Monitoring Tools:
Sticky Traps: Place yellow sticky traps throughout grow area. Check traps weekly. Traps catch flying pests and provide early warning of problems.
Record Keeping: Keep simple records of inspections and any problems found. This helps identify patterns and track effectiveness of treatments.
📂 Integrated Pest Management (IPM)
Integrated Pest Management (IPM) is a comprehensive approach to pest control that combines multiple control methods in a systematic way. IPM is more effective and sustainable than relying on single control methods.
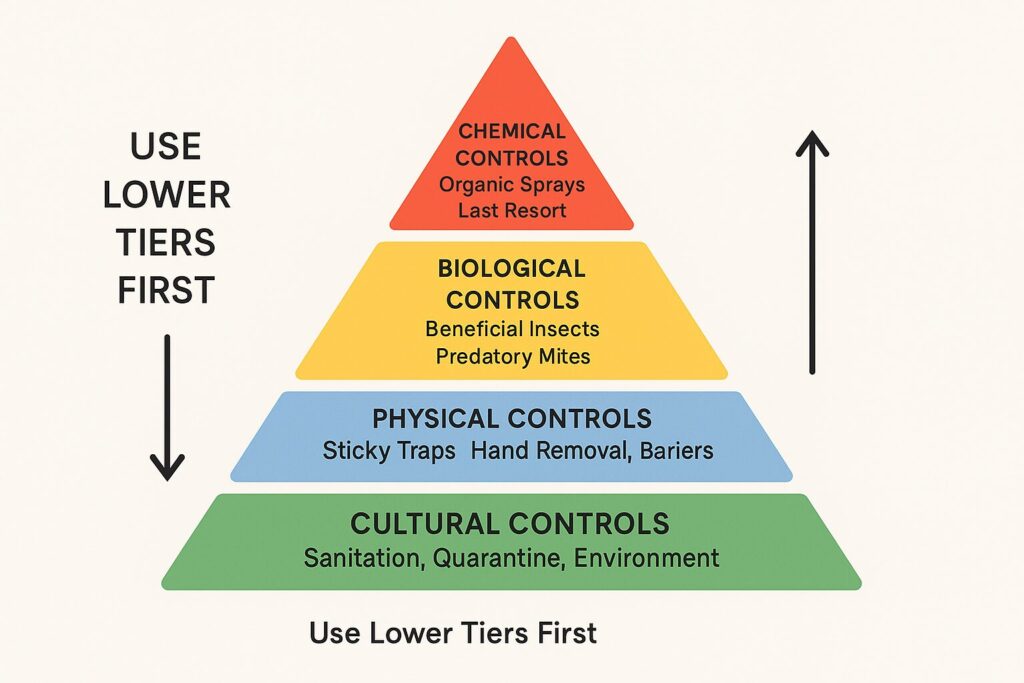
Figure 4: Integrated Pest Management pyramid showing hierarchy of control methods
IPM Principles
IPM follows a hierarchical approach, using the least invasive methods first and escalating only when necessary.
1. Prevention: The foundation of IPM. Prevent pest problems through sanitation, quarantine, environmental controls, and resistant varieties.
2. Monitoring: Regular inspection and monitoring to detect pests early when populations are small.
3. Identification: Accurate identification of pests to select appropriate control methods.
4. Action Thresholds: Determine when pest populations require intervention. Not every pest requires treatment—small populations may be acceptable.
5. Control Methods: Use multiple control methods in order of preference: cultural, physical, biological, chemical.
Cultural Controls
Cultural controls are growing practices that prevent or reduce pest problems.
Sanitation: Keep grow area clean. Remove debris and plant waste.
Plant Selection: Choose pest-resistant varieties when available.
Plant Health: Maintain healthy plants through proper nutrition, watering, and environmental conditions. Healthy plants resist pests better than stressed plants.
Crop Rotation: For soil growers, rotate crops and growing locations to break pest cycles.
Timing: Plant or transplant at times that avoid peak pest populations.
Physical Controls
Physical controls directly remove or exclude pests without chemicals.
Hand Removal: Remove pests by hand. Effective for large pests like caterpillars.
Water Spray: Spray pests off plants with water.
Barriers: Use screens, netting, or row covers to exclude pests.
Traps: Use sticky traps, pheromone traps, or light traps to catch pests.
Vacuuming: Vacuum flying pests like whiteflies.
Pruning: Remove infested plant parts.
Biological Controls
Biological controls use living organisms to control pests. This includes beneficial insects, predatory mites, parasitic wasps, and microbial insecticides.
Benefits of Biological Controls:
- Target specific pests without harming beneficial organisms
- No chemical residues
- Pests don’t develop resistance
- Self-sustaining (beneficial organisms reproduce and provide ongoing control)
- Safe for plants, humans, and environment
Common Beneficial Organisms:
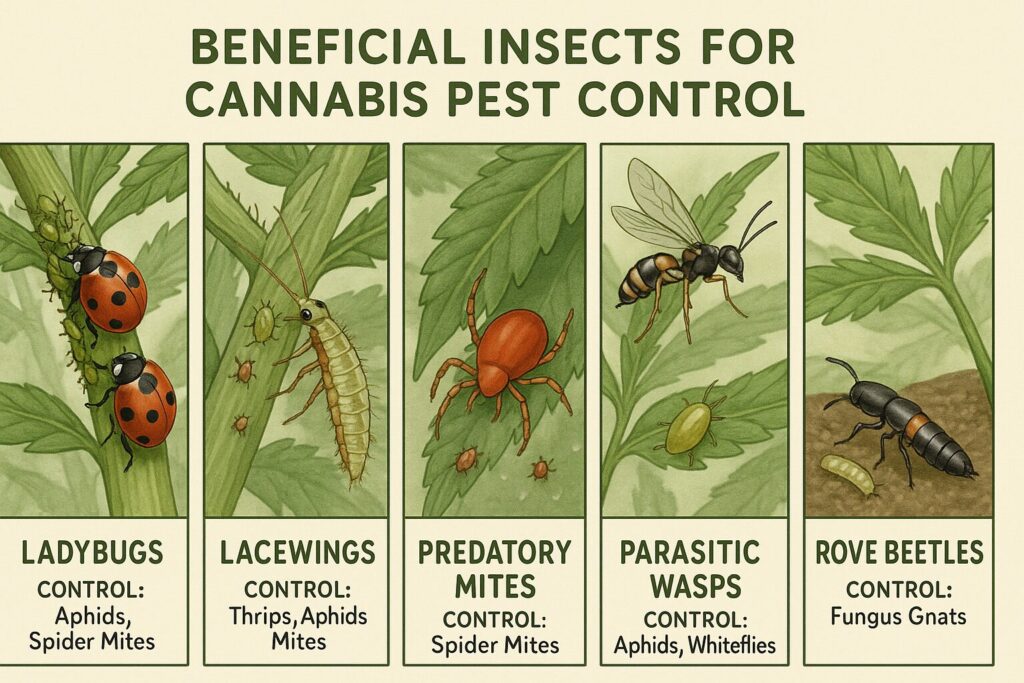
Figure 5: Guide to beneficial insects for cannabis pest control
Ladybugs (Hippodamia convergens): Feed on aphids, spider mites, and other soft-bodied pests. Adults and larvae are predatory. Release 1500-4500 per 1000 square feet.
Green Lacewings (Chrysoperla spp.): Larvae feed on aphids, thrips, spider mites, whiteflies, and other small pests. Very effective generalist predators. Release eggs or larvae.
Predatory Mites (Phytoseiulus persimilis, Neoseiulus californicus, Amblyseius swirskii): Feed on spider mites and thrips. Highly effective and establish populations. Release preventively or at first sign of pests.
Parasitic Wasps: Various species parasitize different pests. Encarsia formosa for whiteflies, Aphidius spp. for aphids, Trichogramma spp. for caterpillar eggs. Release preventively.
Beneficial Nematodes (Steinernema feltiae): Microscopic worms that parasitize soil-dwelling pests including fungus gnat larvae and thrips pupae. Apply to growing medium.
Predatory Beetles: Various beetles feed on pests. Delphastus catalinae for whiteflies, Dalotia coriaria (rove beetles) for fungus gnats.
Microbial Insecticides: Bacillus thuringiensis (Bt) for caterpillars, Bti for fungus gnats. These are living organisms that produce toxins specific to target pests.
Using Beneficial Organisms:
Release beneficials preventively before pest problems occur, or at first sign of pests when populations are small. Follow supplier instructions for release rates and timing.
Provide suitable environment for beneficials. Most require moderate temperatures and humidity. Avoid using broad-spectrum insecticides that kill beneficials.
Be patient. Biological control works more slowly than chemical control but provides longer-lasting results.
Chemical Controls
Chemical controls should be the last resort in IPM, used only when other methods fail or pest populations exceed action thresholds.
Organic vs Synthetic:
Prefer organic pesticides (neem oil, insecticidal soap, horticultural oil, pyrethrin, spinosad) over synthetic chemicals. Organic pesticides are generally safer, break down quickly, and are less likely to leave harmful residues.
Synthetic pesticides should be used only for severe infestations that don’t respond to organic methods, and never during flowering.
Pesticide Selection:
Choose pesticides that target specific pests with minimal impact on beneficial organisms. Avoid broad-spectrum pesticides that kill everything.
Use products labeled for cannabis and safe for food crops. Follow label directions exactly.
Check pre-harvest intervals (PHI)—the time between last application and harvest. Never apply pesticides during flowering unless PHI is zero.
Application:
Apply pesticides in early morning or evening when temperatures are cool and beneficial insects are less active.
Spray thoroughly, covering all plant surfaces especially where pests hide. Most pests are on leaf undersides.
Rotate between different pesticide classes to prevent resistance. Don’t use the same product repeatedly.
Safety:
Wear protective equipment (gloves, eye protection, respirator if recommended).
Keep pesticides away from children and pets.
Store pesticides properly according to label directions.
Dispose of empty containers according to local regulations.
📂 Treatment Options
When prevention fails and pests appear, effective treatment requires choosing appropriate methods for the specific pest and infestation severity.
Organic Sprays
Organic sprays are the first line of treatment for most pest problems. They’re effective, relatively safe, and don’t leave harmful residues when used properly.
Neem Oil:
Derived from neem tree seeds. Contains azadirachtin and other compounds that kill pests and disrupt reproduction and feeding.
Effective Against: Spider mites, aphids, whiteflies, thrips, fungus gnats, leaf miners.
How to Use: Mix 2 tablespoons neem oil + 1 teaspoon mild liquid soap per gallon water. Shake well. Spray thoroughly, covering all plant surfaces. Repeat every 5-7 days for 2-3 weeks.
Notes: Neem works slowly—don’t expect instant results. It’s most effective as preventive or for light infestations. Don’t spray in hot conditions or under lights. Neem can burn leaves if applied incorrectly.
Insecticidal Soap:
Soap solution that kills soft-bodied insects on contact by disrupting their cell membranes.
Effective Against: Aphids, whiteflies, spider mites, thrips, fungus gnats.
How to Use: Mix according to label directions (typically 2-5 tablespoons per gallon water). Spray thoroughly, ensuring complete coverage. Repeat every 2-3 days until pests are gone.
Notes: Soap only kills pests it contacts directly—no residual effect. Must hit pests to work. Rinse plants with plain water 2-3 hours after application to prevent leaf damage. Don’t use in hot conditions.
Horticultural Oil:
Refined petroleum or plant-based oil that suffocates pests and eggs.
Effective Against: Spider mites, aphids, whiteflies, scale insects.
How to Use: Mix according to label directions. Spray thoroughly, covering all plant surfaces. Repeat every 5-7 days if needed.
Notes: Don’t use in hot conditions (above 85°F) or on stressed plants. Oil can burn leaves. Don’t combine with other sprays. Wait 2 weeks between oil and sulfur applications.
Pyrethrin:
Natural insecticide derived from chrysanthemum flowers. Kills insects on contact.
Effective Against: Most insects including aphids, whiteflies, thrips, fungus gnats, caterpillars.
How to Use: Mix according to label directions. Spray in evening (pyrethrin breaks down in sunlight). Repeat every 3-5 days.
Notes: Pyrethrin is broad-spectrum and kills beneficial insects. Use selectively. Some formulations contain synergists (piperonyl butoxide) that increase effectiveness but may not be organic.
Spinosad:
Organic insecticide derived from soil bacteria. Works by ingestion and contact.
Effective Against: Thrips, caterpillars, leaf miners, fungus gnats.
How to Use: Mix according to label directions. Spray thoroughly. Repeat every 5-7 days for 2-3 weeks.
Notes: Spinosad is highly effective and relatively safe. Toxic to bees, so don’t spray flowering plants outdoors. Allow spray to dry before releasing beneficial insects.
Beneficial Insects
Beneficial insects provide biological control of pests. They’re effective, sustainable, and safe.
When to Use:
Release beneficial insects preventively before pest problems occur, or at first sign of pests when populations are small. Don’t wait until infestations are severe—beneficials work best against small pest populations.
Where to Buy:
Purchase beneficial insects from reputable suppliers specializing in biological control. Common suppliers include Koppert, Biobest, Arbico Organics, and Nature’s Control.
How to Release:
Follow supplier instructions for release rates, timing, and methods. Generally:
- Release in early morning or evening when temperatures are moderate
- Mist plants before releasing (provides moisture for beneficials)
- Distribute beneficials throughout grow area, not all in one spot
- Release near pest hotspots but also in uninfested areas for prevention
Establishing Populations:
Beneficial insects need suitable conditions to establish and reproduce:
- Moderate temperatures (65-80°F for most species)
- Adequate humidity (40-60%)
- Presence of pests (food source)
- No broad-spectrum pesticides
Make multiple releases if needed. Initial releases may not establish. Repeated releases increase success.
Compatibility:
Beneficial insects are compatible with most organic sprays if timing is managed. Wait 3-7 days after spraying before releasing beneficials. Avoid pyrethrin and spinosad immediately before releases.
Systemic Treatments
Systemic insecticides are absorbed by plants and transported through vascular system. They kill pests that feed on treated plants.
Benefits:
- Provide long-lasting protection (weeks)
- Reach pests that hide or are difficult to spray
- Not affected by rain or irrigation
Drawbacks:
- Can harm beneficial insects
- May leave residues in plant tissue
- Not suitable for use during flowering
- Environmental concerns
When to Use:
Use systemic treatments only for severe infestations that don’t respond to other methods, and only during vegetative growth. Never use systemics during flowering.
Common Systemics:
Azadirachtin (Neem Extract): Derived from neem. Systemic properties when applied as soil drench. Relatively safe.
Imidacloprid: Synthetic neonicotinoid. Very effective but controversial due to environmental concerns. Use only as last resort.
Application:
Follow label directions exactly. Apply as soil drench or foliar spray depending on product. Observe pre-harvest intervals.
Application Methods
Proper application technique ensures treatments are effective.
Foliar Spraying:
Most pest treatments are applied as foliar sprays.
Technique:
- Mix spray according to directions. Use clean water (room temperature, pH 6.0-7.0).
- Fill spray bottle or pump sprayer. Shake well before and during application.
- Spray in early morning or evening when temperatures are cool (below 75°F).
- Never spray under lights or in hot conditions—this causes leaf burn.
- Spray thoroughly, covering all plant surfaces. Focus on leaf undersides where most pests hide.
- Spray until solution drips from leaves. Complete coverage is essential.
- Repeat applications according to product directions (typically every 2-7 days).
Safety:
- Wear gloves and eye protection.
- Spray in well-ventilated area.
- Don’t spray during flowering unless product is specifically labeled safe for flowering plants.
Soil Drenching:
Some treatments (beneficial nematodes, Bti, systemic insecticides) are applied as soil drenches.
Technique:
- Mix treatment according to directions.
- Water plants normally first to moisten medium.
- Apply treatment solution to soil surface, allowing it to soak into medium.
- Apply enough solution to thoroughly wet root zone.
- Don’t water again for 24-48 hours to allow treatment to work.
📊 Pest vs Disease
Some diseases cause symptoms similar to pest damage. Distinguishing between pests and diseases is important for effective treatment.
Pest Characteristics:
- Insects or mites are visible (though may be very small)
- Damage patterns are consistent with feeding behavior (chewing, sucking, tunneling)
- Damage progresses as pest populations grow
- Symptoms improve with pest control treatments
- Pests can be seen moving on plants or captured on sticky traps
Disease Characteristics:
- No insects or mites visible
- Symptoms include mold, mildew, spots, wilting, or rot
- Damage may appear suddenly
- Symptoms don’t improve with pest control treatments
- Often associated with environmental conditions (high humidity, poor air circulation)
Common Confusions:
Spider Mites vs Nutrient Deficiency: Spider mite stippling can resemble nutrient deficiency. Check for webbing and tiny moving dots on leaf undersides to confirm mites.
Thrips vs Disease: Thrips damage (silvery streaks) can resemble viral infection. Check for tiny insects and black frass to confirm thrips.
Fungus Gnat Damage vs Root Rot: Both cause wilting and yellowing. Check for flying gnats and larvae in soil to confirm fungus gnats. Check roots—healthy roots are white, rotted roots are brown and slimy.
When in Doubt:
Use magnifying glass to examine plants carefully. Look for insects, eggs, webbing, and frass. Check multiple plants—pests typically affect multiple plants, while diseases may be localized.
Take photos and consult experienced growers or extension services for identification help.
📂 Common Treatment Mistakes
Even experienced growers make mistakes when treating pest problems. Understanding common pitfalls helps you avoid them.
Not Identifying Pests Correctly:
Different pests require different treatments. Misidentification leads to ineffective treatment. Take time to identify pests accurately before treating.
Waiting Too Long:
Small infestations are easy to control. Severe infestations are difficult or impossible to control. Treat immediately when pests are detected.
Incomplete Coverage:
Most pests hide on leaf undersides. Spraying only leaf tops misses most pests. Always spray thoroughly, covering all plant surfaces especially undersides.
Not Repeating Treatments:
Single applications rarely eliminate pests. Most treatments must be repeated every few days for 2-3 weeks to break pest life cycles. Follow treatment schedules consistently.
Using Same Product Repeatedly:
Pests develop resistance quickly when exposed to the same pesticide repeatedly. Rotate between different products with different modes of action.
Spraying During Flowering:
Most pesticides shouldn’t be used during flowering. Residues contaminate buds. If pest problems occur during flowering, use only water sprays, physical removal, or beneficial insects.
Spraying in Hot Conditions:
Spraying under lights or in hot conditions causes leaf burn. Always spray in early morning or evening when temperatures are cool.
Killing Beneficial Insects:
Broad-spectrum pesticides kill beneficial insects along with pests. This removes natural pest control and can make pest problems worse. Use selective treatments that target specific pests.
Ignoring Prevention:
Treating pest problems without addressing underlying causes (poor sanitation, lack of quarantine, environmental issues) leads to recurring infestations. Implement prevention methods to stop problems from returning.
Giving Up:
Pest control requires persistence. Don’t give up after one or two treatments. Continue treatment until pests are eliminated, then implement prevention to keep them from returning.
❓ Frequently Asked Questions
❓ How do I know if I have spider mites or thrips?
Spider mites cause yellow stippling (tiny dots) and produce fine webbing. Thrips cause silvery streaks and leave black frass (droppings). Use magnifying glass to see pests—spider mites are round with 8 legs, thrips are elongated with 6 legs and wings.
❓ Can I use beneficial insects indoors?
Yes. Beneficial insects work well indoors. Many species (predatory mites, parasitic wasps) are specifically suited for indoor growing. Provide suitable temperature and humidity, and avoid broad-spectrum pesticides.
❓ Is it safe to spray neem oil during flowering?
Avoid spraying anything on flowers if possible. Neem oil can affect taste and smell of buds. If treatment is necessary during flowering, use water sprays or beneficial insects instead of oils or soaps.
❓ How often should I inspect plants for pests?
Inspect plants daily. This takes only a few minutes but catches problems early when they’re easy to control. Use magnifying glass to check leaf undersides where most pests hide.
❓ Do I need to treat if I only see a few pests?
Yes. A few pests quickly become many pests. Most cannabis pests reproduce rapidly. Treat immediately when pests are detected, even if populations are small.
❓ Can I use multiple treatments at the same time?
Generally yes, but check product labels for compatibility. Don’t mix oils with soaps or sulfur. Space different spray treatments 2-3 days apart. Beneficial insects can be used with most organic sprays if timing is managed.
❓ Why do pests keep coming back?
Recurring infestations indicate inadequate treatment (incomplete coverage, not repeating applications, treating only one life stage) or ongoing pest sources (poor sanitation, no quarantine, contaminated equipment). Address both treatment and prevention.
❓ Are organic pesticides safe?
Organic pesticides are generally safer than synthetic chemicals, but they’re not harmless. Follow label directions, wear protective equipment, and avoid spraying during flowering. “Organic” doesn’t mean “completely safe.”
❓ How do I prevent pests in the first place?
Maintain clean grow area, quarantine new plants for 2-3 weeks, inspect plants daily, control temperature and humidity, ensure good air circulation, and use preventive releases of beneficial insects.
❓ What’s the best treatment for spider mites?
No single best treatment. Effective spider mite control requires multiple methods: increase humidity, spray with neem oil or insecticidal soap every 3-5 days, release predatory mites, and maintain persistence. Spider mites are challenging—expect 2-3 weeks of consistent treatment.
📂 References
[1] Cranshaw, W., Halbritter, A., & Britt, K. (2020). Hemp insect and mite pests in the West. Colorado State University Extension. https://extension.colostate.edu/topic-areas/agriculture/hemp-insect-and-mite-pests-in-the-west/
[2] Van Leeuwen, T., Vontas, J., Tsagkarakou, A., Dermauw, W., & Tirry, L. (2010). Acaricide resistance mechanisms in the two-spotted spider mite Tetranychus urticae and other important Acari: A review. Insect Biochemistry and Molecular Biology, 40(8), 563-572.
[3] Cloyd, R. A. (2015). Ecology of fungus gnats (Bradysia spp.) in greenhouse production systems associated with disease-interactions and alternative management strategies. Insects, 6(2), 325-332.
[4] Reitz, S. R. (2009). Biology and ecology of the western flower thrips (Thysanoptera: Thripidae): The making of a pest. Florida Entomologist, 92(1), 7-13.
[5] Van Emden, H. F., & Harrington, R. (Eds.). (2017). Aphids as crop pests (2nd ed.). CABI.
[6] Stansly, P. A., & Naranjo, S. E. (Eds.). (2010). Bemisia: Bionomics and management of a global pest. Springer.
[7] Weintraub, P. G., & Horowitz, A. R. (2009). Biological control of arthropod pests of cannabis. In Biocontrol Science and Technology (pp. 1-26). Taylor & Francis.
[8] Gerson, U., Smiley, R. L., & Ochoa, R. (2003). Mites (Acari) for pest control. Blackwell Science.
This guide is for educational purposes only. Always check local laws regarding cannabis cultivation before starting to grow. Follow all pesticide label directions and safety precautions.